Build/Deploy
You've written the code—now it's time to turn it into a running service. KIWI helps you handle the complex build/deploy process with just a few clicks.
Your service must be registered in the [Service Management] page. If you haven't registered it yet, check out the Service Registration Guide first.
Why Do You Need Build/Deploy?
To turn your code into a service that users can access, you need to package the code as a container image and deploy it to a server. Doing this manually is error-prone and time-consuming.
KIWI automates this process, enabling consistent and reliable deployments.
Build/Deploy Flow
The KIWI build/deploy process consists of the following steps:
- 1. Build Setup: Configure Dockerfile and build options. Duration: One-time only.
- 2. Image Build: Convert source code to container image using Kaniko. Duration: 2-10 min.
- 3. Image Push: Upload built image to Harbor/DockerHub. Duration: 1-3 min.
- 4. Deploy: Deploy image to Kubernetes or Docker. Duration: 1-5 min.
Kaniko is a tool that builds container images inside a container without a Docker daemon. It allows you to safely build images in Kubernetes environments without privilege escalation, making it widely used in enterprise environments.
Setting Up CI Build
Configure the CI build pipeline for your service. Once set up, it will automatically apply to subsequent builds.
Step 1: Navigate to the Service Detail Page
Click the service to build in the [Service Management] page to navigate to the detail page.
Step 2: Open Build Settings from the Build Tab
Click the Build tab in the top navigation, then click the Build Settings button to open the settings modal.
Step 3: Configure Dockerfile
Choose how to configure the Dockerfile:
- Auto-detect (recommended): Automatically finds the Dockerfile in the repository. Recommended for most projects.
- Specify path: Manually enter the Dockerfile path. Use when there are multiple Dockerfiles. (e.g.,
./docker/Dockerfile.prod) - Build Wizard: KIWI automatically generates a Dockerfile. Use for projects without a Dockerfile.
Using the Build Wizard, you can automatically generate a Dockerfile optimized for your project by just selecting your language (Node.js, Python, Java, etc.) and framework.
Step 4: Configure Build Arguments (Optional)
Set build arguments if needed:
- Build context: The directory where Docker build starts. Default is
.(project root). - Build args (ARG): Values to pass to the Dockerfile. Useful for environment-specific settings.
- Example:
NODE_ENV=production,API_URL=https://api.example.com
- Example:
- Target stage: Build only up to a specific stage in multi-stage builds.
Build context determines the scope of files accessible by COPY and ADD commands in the Dockerfile. Usually the project root (.) is used, but in monorepo structures, you can specify a specific subdirectory.
Step 5: Configure Image Registry
Enter the registry information where the built image will be stored:
- Registry URL: Harbor or DockerHub address (e.g.,
harbor.company.com) - Project/Namespace: Image storage location (e.g.,
library) - Image name: Image name (e.g.,
my-web-app) - Tag rule: Version tagging method
Available tag variables:
${BRANCH}: Git branch name. (e.g.,main)${SHORT_SHA}: First 7 characters of commit hash. (e.g.,a1b2c3d)${TAG}: Git tag. (e.g.,v1.0.0)${BUILD_NUMBER}: Build number. (e.g.,42)
Example: ${BRANCH}-${SHORT_SHA} → main-a1b2c3d
Step 6: Configure Build Trigger
Select the conditions under which a build is triggered:
- Manual: Only runs when build button is clicked. Use for test builds and emergency deployments.
- Commit push: Auto build when code is pushed to specific branch. Use for dev/staging environments.
- Tag creation: Auto build when Git tag is created. Use for release deployments.
- Schedule: Regular builds based on cron schedule. Use for nightly builds and weekly builds.
- develop branch: Commit push → Auto deploy to dev environment.
- main branch: Commit push → Auto deploy to staging environment.
- v tags*: Tag creation → Production deployment.
Step 7: Save Settings
Click the Save button to save the build settings.
Building a Container Image
Once setup is complete, let's actually build an image.
Step 1: Select Branch from the Build Tab
Navigate to [Service Management] → Select service → Build tab. Select the branch to build from the branch selection dropdown.
Step 2: Run the Build
Click the Start Build button. When the build starts, a real-time log viewer is displayed.
Step 3: Monitor Build Progress
The build progresses through the following stages:
- Source clone: Fetch code from Git repository. Expected time: 10-30 sec.
- Dockerfile analysis: Establish build plan. Expected time: 5-10 sec.
- Layer build: Build image layers sequentially. Expected time: 1-5 min.
- Image push: Upload completed image to registry. Expected time: 30 sec-2 min.
If an error occurs during build, search for error or failed keywords in the log. Most issues are Dockerfile syntax errors or dependency installation failures.
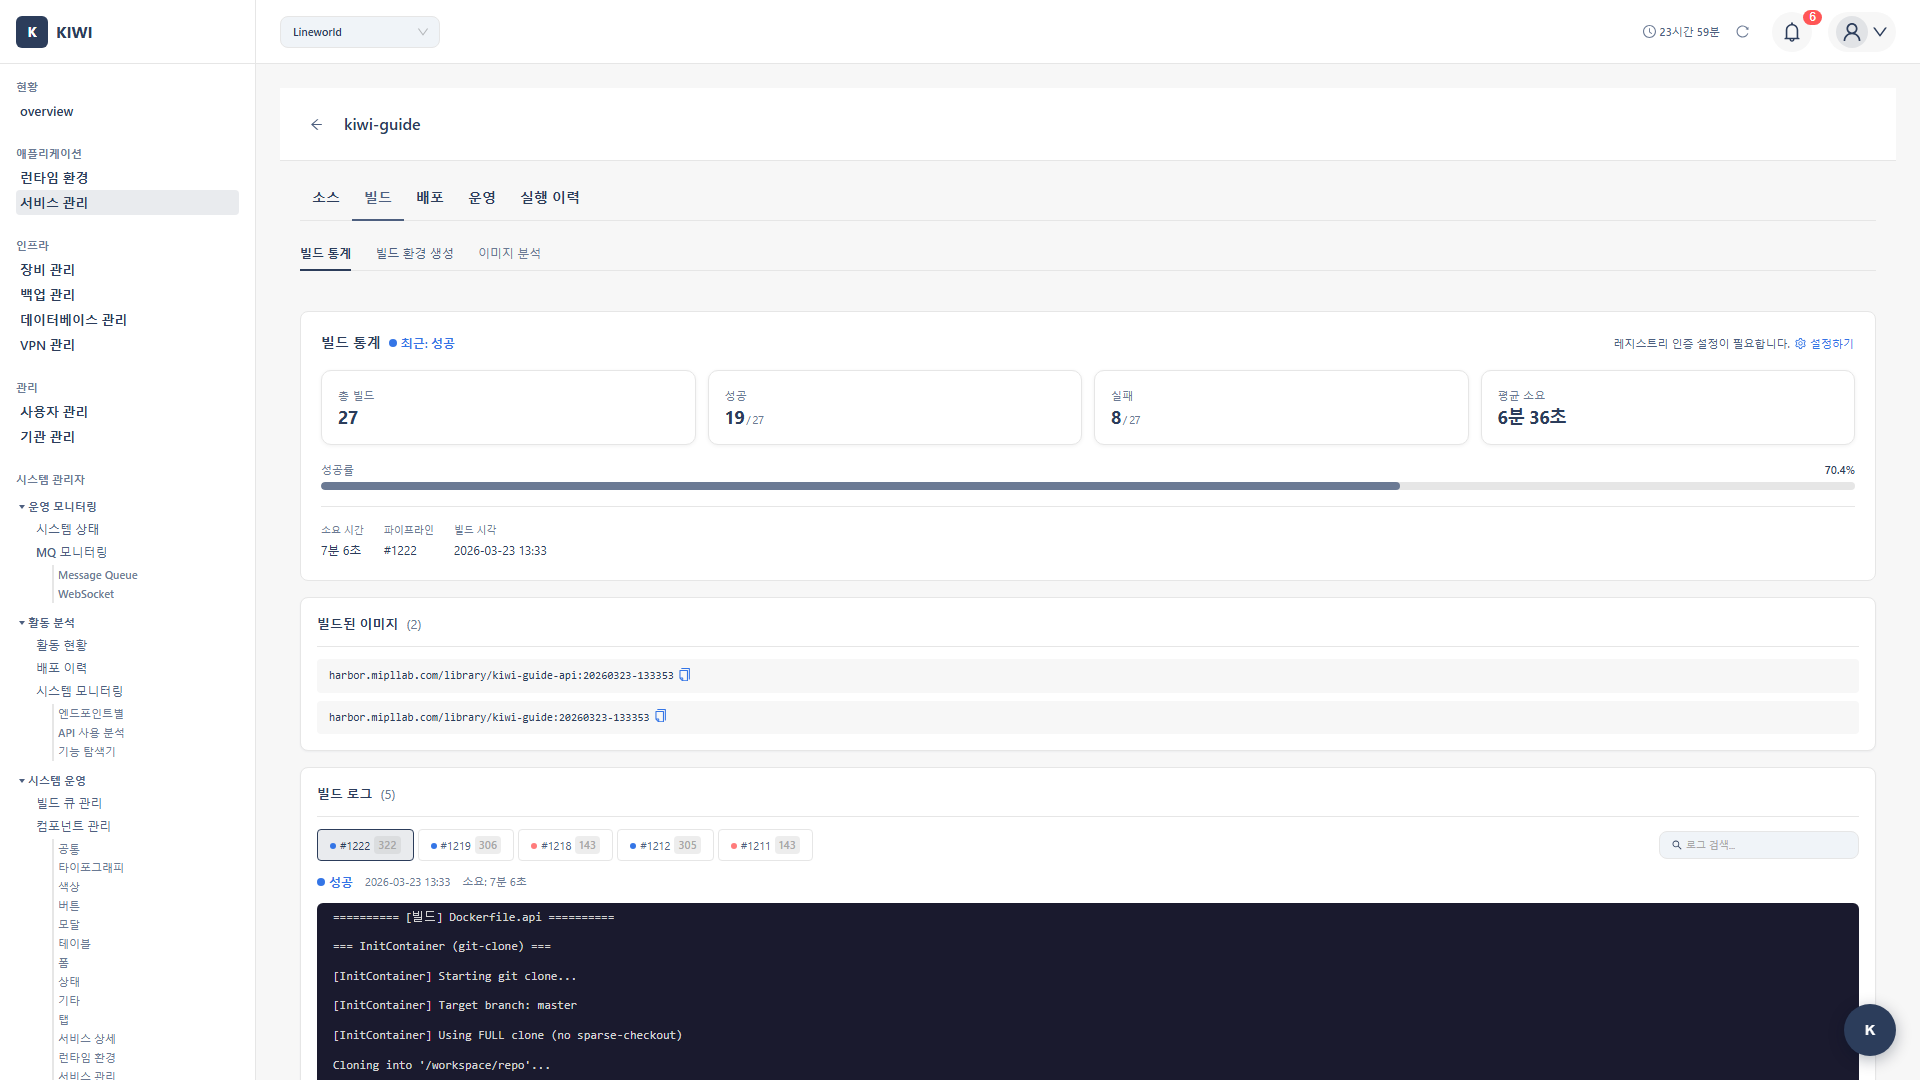
Step 4: Verify Build Completion
When the build is complete, check the following on the result screen:
- Build status: Success or Failure
- Image tag: Full path and tag of the generated image
- Image size: Final image size (smaller = faster deployment)
- Duration: Total time taken for the build
Deploying to Kubernetes
Deploy the built image to a Kubernetes cluster. Kubernetes is a powerful platform that automatically manages containers and auto-recovers from failures.
- The Kubernetes cluster must be registered in [Runtime Environment]
- The image must be built and pushed to the registry.
Step 1: Select Environment from the Deploy Tab
Navigate to [Service Management] → Select service → Deploy tab. Select the deployment environment:
- Development: Development environment. Suitable for quick testing with low resources.
- Staging: QA/test environment. Configured similar to production settings.
- Production: Live environment. Allocated with high availability and sufficient resources.
Step 2: Select Cluster and Namespace
Select the Kubernetes cluster to deploy to from the cluster dropdown and specify the namespace.
A namespace is a way to logically separate resources in Kubernetes. For example, you can separate environments with development, staging, and production namespaces.
Step 3: Configure Deployment Settings
Enter the required deployment settings:
- Image tag: Version of the image to deploy (e.g.,
main-abc123) - Replica count: Number of Pod replicas.
- Dev environment: 1 is sufficient.
- Staging: 2+ recommended (similar to production)
- Production: Minimum 2+ (for availability)
With 2+ replicas, if one Pod has a problem, other Pods can handle requests.
Step 4: Configure Resource Settings
Set the CPU and memory to allocate to each Pod:
- CPU request: Minimum guaranteed CPU. (e.g.,
100m= 0.1 cores) - CPU limit: Maximum usable CPU. (e.g.,
500m= 0.5 cores) - Memory request: Minimum guaranteed memory. (e.g.,
128Mi= 128 megabytes) - Memory limit: Maximum usable memory. (e.g.,
512Mi= 512 megabytes)
Setting memory limits too low can cause the application to be terminated due to OOM (Out of Memory). Set it generously above the application's average memory usage.
Step 5: Configure Environment Variables (Optional)
Set environment variables needed by the application:
- Direct input: Enter key-value pairs directly.
- ConfigMap reference: Fetch values from Kubernetes ConfigMap
- Secret reference: Use Secrets for sensitive information like passwords and API keys.
Step 6: Select Deployment Strategy
The deployment strategy affects whether there's service interruption:
- Rolling Update (default recommended): Gradually deploys the new version. No service interruption, recommended for most cases.
- Recreate: Terminates existing Pods, then deploys the new version. Service interruption occurs. Use for special cases like DB migrations.
- Blue-Green: Deploys the new version separately, then switches traffic. No service interruption. Suitable when instant rollback is needed.
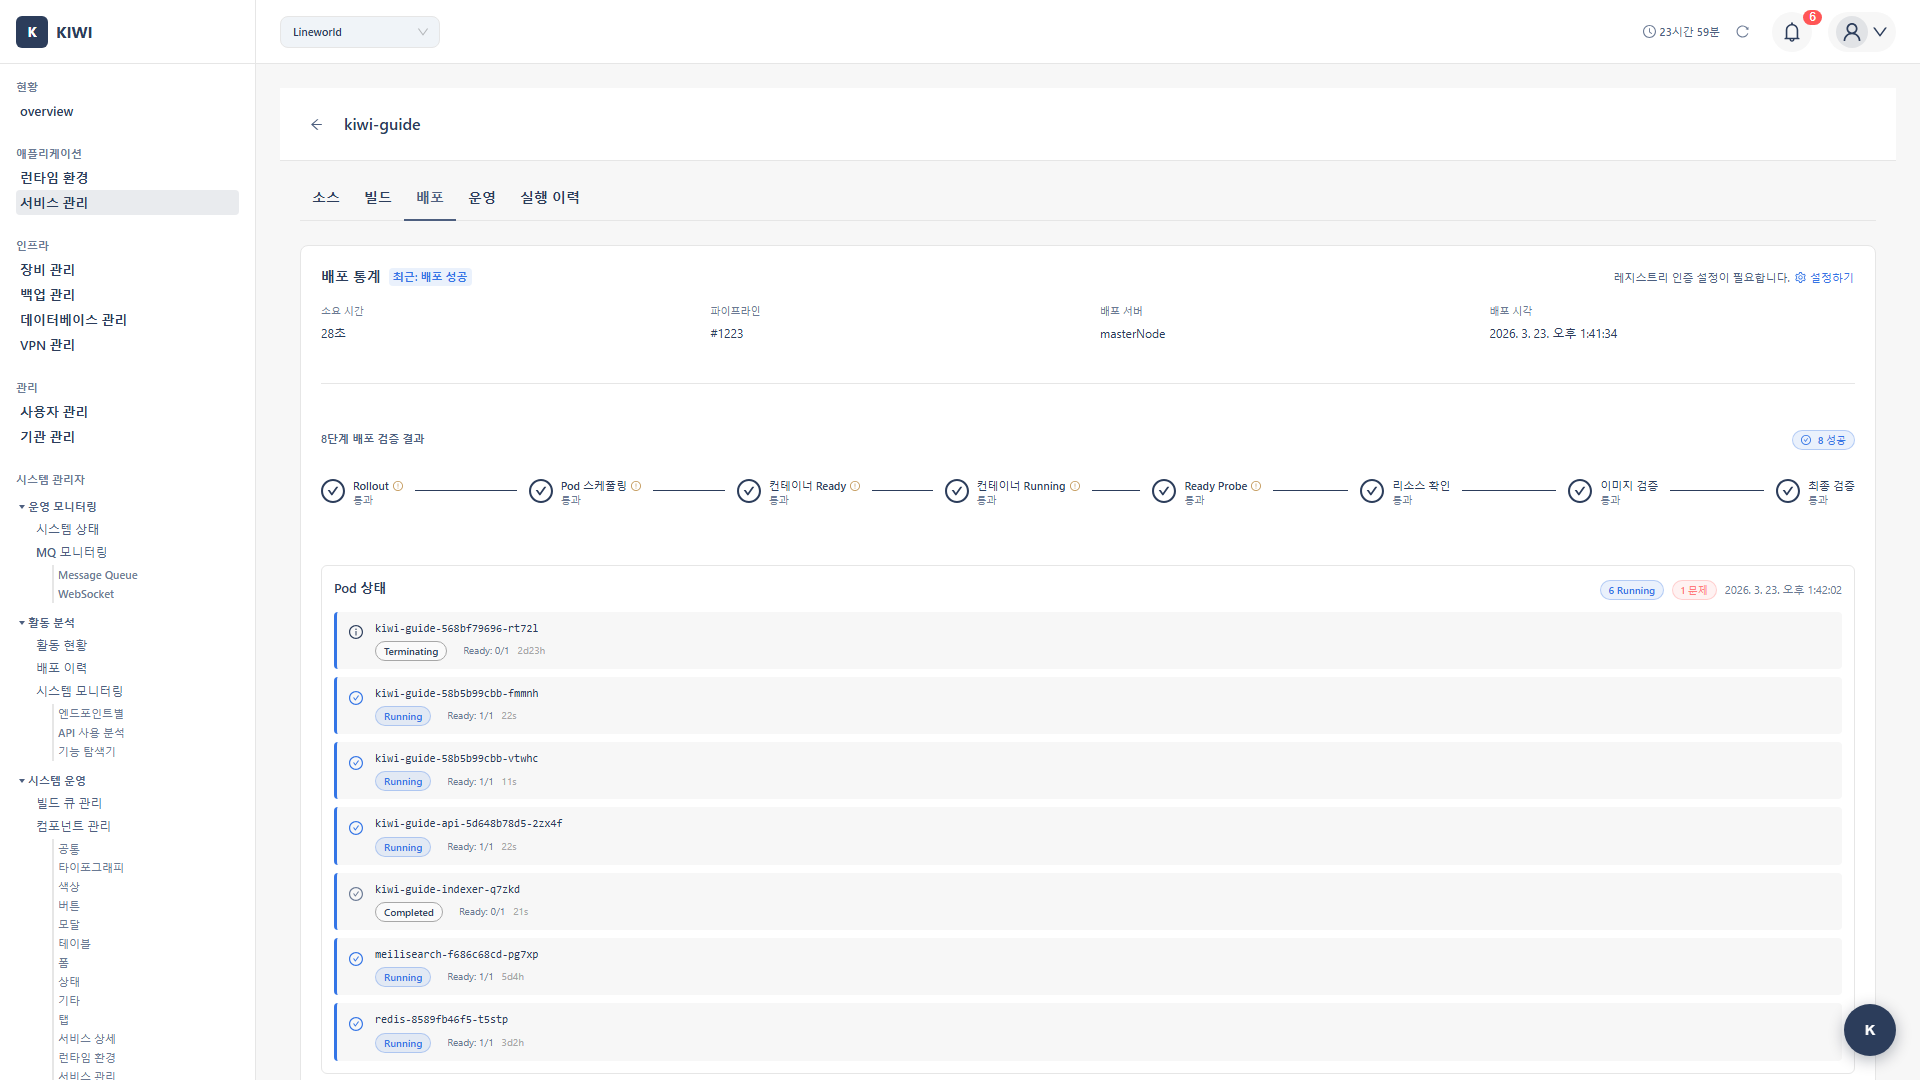
Step 7: Execute Deployment and Verify Status
Click the Deploy button. You can monitor deployment progress in real time.
When deployment is complete, verify:
- Pod status: Should be Running for normal operation.
- Replica count: Ready/Total should match (e.g., 3/3)
- Event log: Check for any errors.
Deploying to Docker/Podman
For single-server environments without Kubernetes, you can deploy directly to Docker or Podman. Simple to configure and suitable for small projects.
Docker/Podman runtime must be registered in [Runtime Environment].
Step 1: Select Docker from the Deploy Tab
Navigate to [Service Management] → Select service → Deploy tab. Select Docker as the deployment type and choose the target runtime from the dropdown.
Step 2: Configure Container Settings
Enter the container information:
- Container name: Name to identify the container. (e.g.,
my-web-app) - Image tag: Full path of the image to deploy. (e.g.,
harbor.company.com/library/app:latest) - Port mapping: Host:container port mapping. (e.g.,
8080:80)
8080:80 means "forward requests coming to host port 8080 to container port 80". Web applications usually use port 80 or 8080 inside the container.
Step 3: Configure Volume Mounts (Optional)
Set volumes to persist data even when the container restarts:
- Host path: Directory on the server (e.g.,
/data/app) - Container path: Mount location inside the container (e.g.,
/app/data) - Read-only: Check for config files that don't need modification.
- When storing uploaded files.
- When keeping logs on the host
- When persisting database files.
Step 4: Configure Environment Variables and Deploy
Enter the required environment variables and click the Deploy button.
When deployment is complete, verify container status:
- Running: Operating normally
- Stopped: Stopped (manual or error)
- Error: Error occurred (check logs)
Rolling Back to a Previous Version
Did a problem occur after deployment? Don't worry. With KIWI, you can roll back to a previous version with just a few clicks.
Rolling back will revert all changes from the current version. If there were database schema changes, verify the data migration impact before rolling back.
Step 1: Select Rollback Target from Deployment History
In [Service Management] → Select service → Deploy tab, check the deployment history table.
You can see the following information for each deployment entry:
- Deployment time: When it was deployed.
- Image tag: Which version it is
- Deployment status: Success/Failure
- Deployer: Who deployed it
Step 2: Execute Rollback
Click the Rollback button for the deployment entry you want to roll back to, then click Execute Rollback in the confirmation modal.
Step 3: Verify Rollback Completion
When rollback is complete, verify that the service status and Pod status are normal. When using Rolling Update strategy, there's no service interruption during rollback.
Using Blue-Green deployment strategy, rollback is almost instant since only traffic is switched. Consider Blue-Green strategy for critical services.
Optimizing Build Time
If builds are taking more than 5 minutes, optimization may be needed. The following methods can significantly reduce build time.
Enable Cache Settings
Enable cache options in the build settings:
- Layer cache: Reuses unchanged Docker layers. Most effective method.
- Registry cache: Utilizes layers from existing images in the registry. Effective except for the first build.
- Local cache: Uses local cache of the build node. Effective for builds on the same node.
Dockerfile Optimization Tips
- Place layers with fewer changes earlier: Run dependency installation (npm install, pip install) before code copy
- Use multi-stage builds: Keep build tools only in build stage, include only runtime necessities in final image
- Use
.dockerignore: Exclude unnecessary files likenode_modules,.git, test files. - Use small base images:
alpine-based images are smaller, making builds and deployments faster.
Frequently Asked Questions
Build is failing
How to identify the cause:
- Search for
errororfailedkeywords in build log - Check Dockerfile syntax errors (indentation, command order)
- Check dependency installation commands (network, version compatibility)
The most common cause is dependency installation failure. Check the logs around npm install or pip install first.
Image push is failing
Things to check:
- Verify registry URL is correct
- Verify authentication credentials (username/password or token) are correct
- Verify project/namespace exists in the registry.
Pods are not starting after deployment
Things to check:
- ImagePullBackOff: Check image path and registry authentication Secret
- CrashLoopBackOff: Application startup error. Check container logs.
- Pending: Insufficient resources (CPU/memory) or node scheduling issue
Rollback is not working
The previous image must exist in the registry for rollback to be possible. Check the image retention policy in your registry.
We recommend keeping at least the last 10 versions of images. Be careful when setting automatic old image deletion policies in your registry.
Related Guides
- Security Scan Setup - Automatic security scan during build
- Dashboard Usage - Deployment status monitoring.