Service Registration
When you integrate your Git repository's source code with KIWI, you can automate the entire process from code changes to deployment. This guide walks you through registering a service and completing your first build.
Why Do You Need Service Registration?
Registering your service with KIWI provides the following benefits:
- Build: Without KIWI, you must run docker build locally. With KIWI, simply click a button or set up auto trigger.
- Deploy: Without KIWI, you must run kubectl/docker commands manually. With KIWI, one-click deployment.
- Security Scan: Without KIWI, you must install and run separate tools. With KIWI, auto-run during build.
- Rollback: Without KIWI, you must find previous image and deploy manually. With KIWI, click from deployment history.
Prerequisites
Before registering a service, prepare the following:
- Git repository URL: Repository address from GitLab, GitHub, etc.
- Repository access token: Personal Access Token (creation method explained below)
- Runtime environment: Kubernetes or Docker for deployment must be registered in [Runtime Environment]
If you cannot access this feature, please request service permission from your organization manager.
Integrating a Git Repository
Integrate your company's Git repository with KIWI. Once integrated, it will automatically be used for all subsequent builds/deployments.
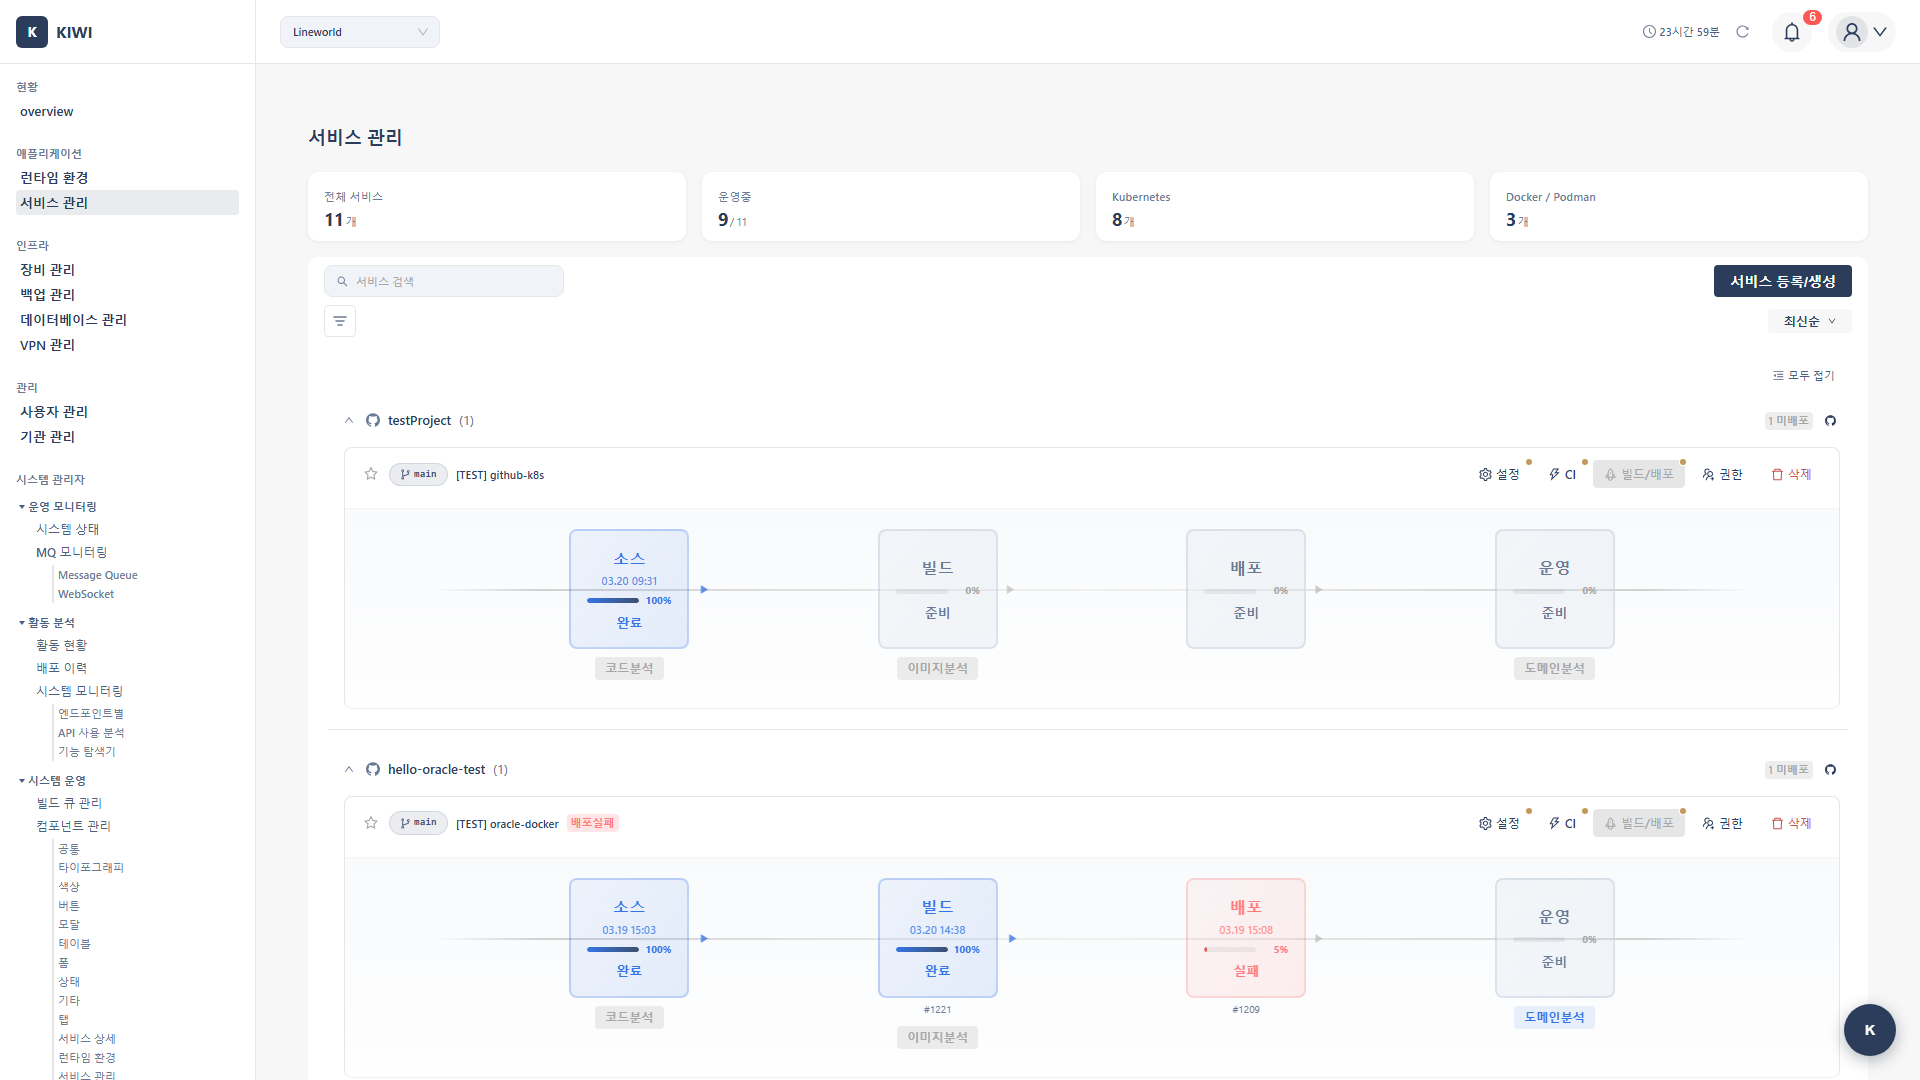
Step 1: Start Service Registration
Click [Service Management] in the left menu, then click the Register Service button in the top right.
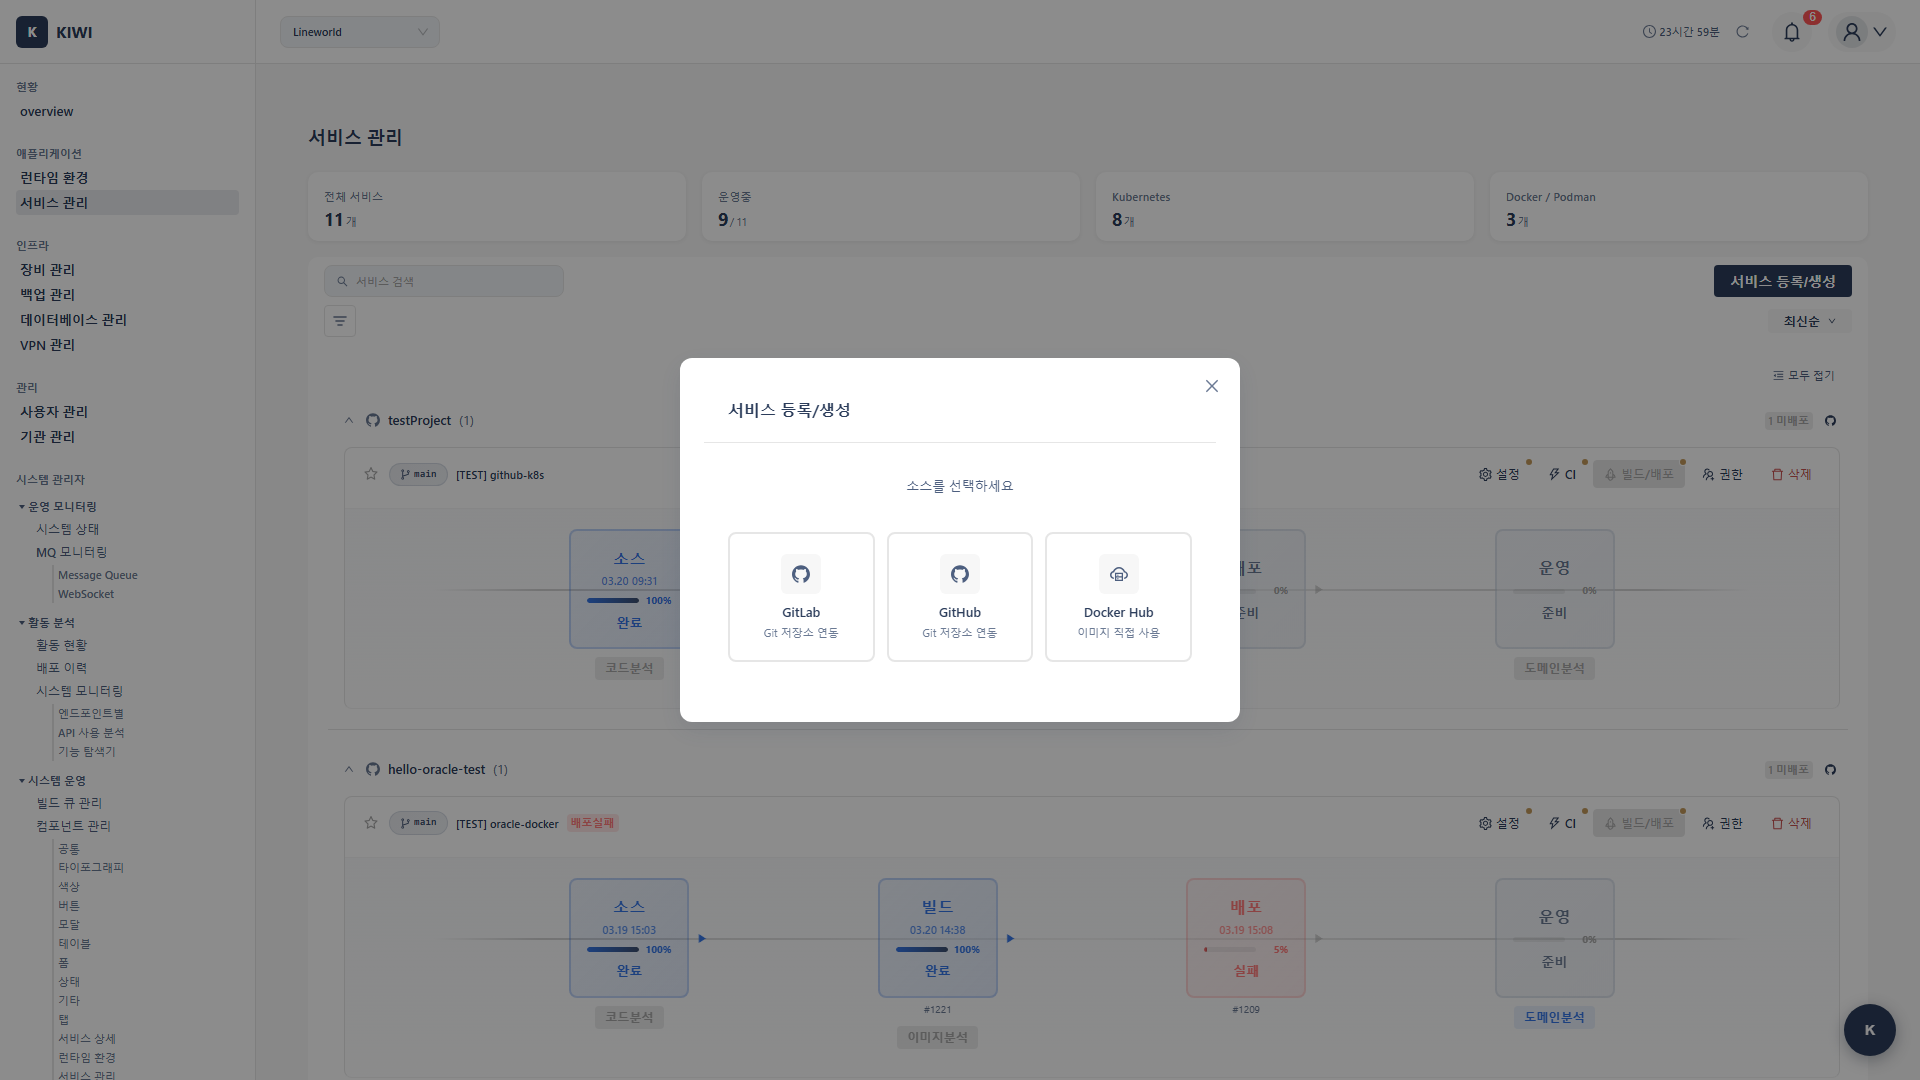
Step 2: Enter Git Repository Information
Enter the repository information in the service registration wizard:
- Service name: Easily identifiable name within the team. (e.g.,
user-api,payment-service) - Git URL: Clone URL of the repository. (e.g.,
https://gitlab.com/company/project.git) - Branch: Default branch to build. (e.g.,
main,develop) - Authentication method: Personal Access Token recommended.
Step 3: Create a GitLab Personal Access Token
KIWI needs a token to access the repository.
- Log in to GitLab → Click profile icon in top right
- Select Settings → Access Tokens menu
- Enter token name (e.g.,
KIWI-access) - Set expiration date (recommended within 1 year for security)
- Select permissions: Check
read_repository,read_api - Click Create personal access token
- Copy the generated token and enter it in KIWI
Note: The token is only visible immediately after creation. Store it in a safe place.
Step 4: Verify Repository Connection
Click the Test Connection button. If successful, the branch list will appear in the dropdown.
- Git URL is correct (should end with
.git) - Token has
read_repositorypermission . - Token has not expired .
Configuring the Build
Configure building a Docker image for the registered service. This setup only needs to be done once and will automatically apply to subsequent builds.
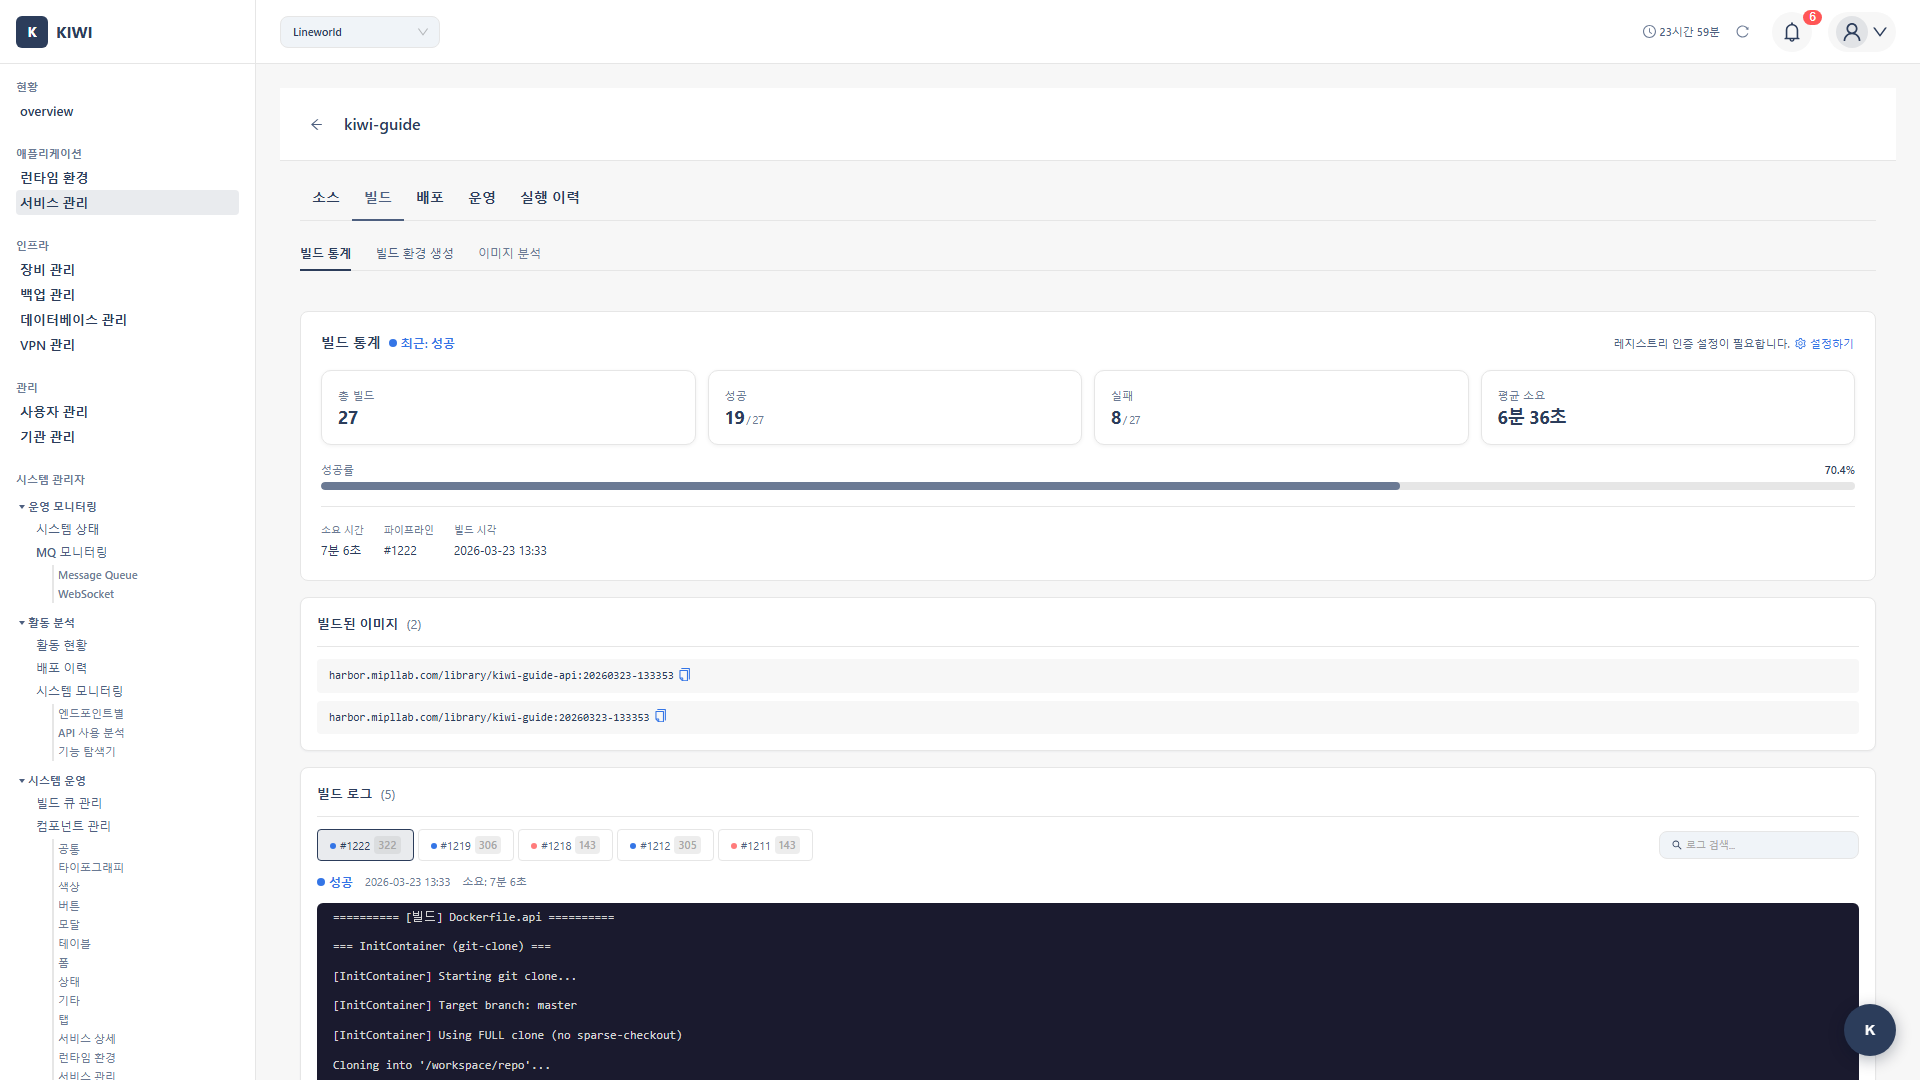
Step 1: Navigate to the Build Tab
Click the registered service in the service list → Click the Build tab at the top.
Step 2: Configure Dockerfile
Choose the Dockerfile configuration method that fits your project:
- Auto-detect: Automatically finds the Dockerfile in the repository. Recommended when Dockerfile is in root.
- Specify path: Manually enter the Dockerfile path. Use when there are multiple Dockerfiles or it's in a subfolder.
- Build Wizard: KIWI auto-generates the Dockerfile. Use when no Dockerfile exists.
Using the Build Wizard, just select your project language (Node.js, Python, Java, Go, etc.) and framework, and an optimized Dockerfile will be automatically generated.
Step 3: Configure Image Registry
Enter the registry information where the built image will be stored:
- Registry URL: Harbor or DockerHub address (e.g.,
harbor.company.com) - Image name: Image path (e.g.,
library/my-web-app) - Tag rule: Version tagging method (e.g.,
${BRANCH}-${SHORT_SHA})
Step 4: Select Build Runtime and Run First Build
Select which registered Kubernetes cluster to use for the build, then click the Start Build button.
KIWI uses Kaniko to safely build images within the Kubernetes cluster. No Docker daemon is needed, providing high security.
You can monitor build logs in real time. The first build may take longer due to dependency downloads.
Configuring the Deployment Environment
Configure deploying the built image to actual servers.
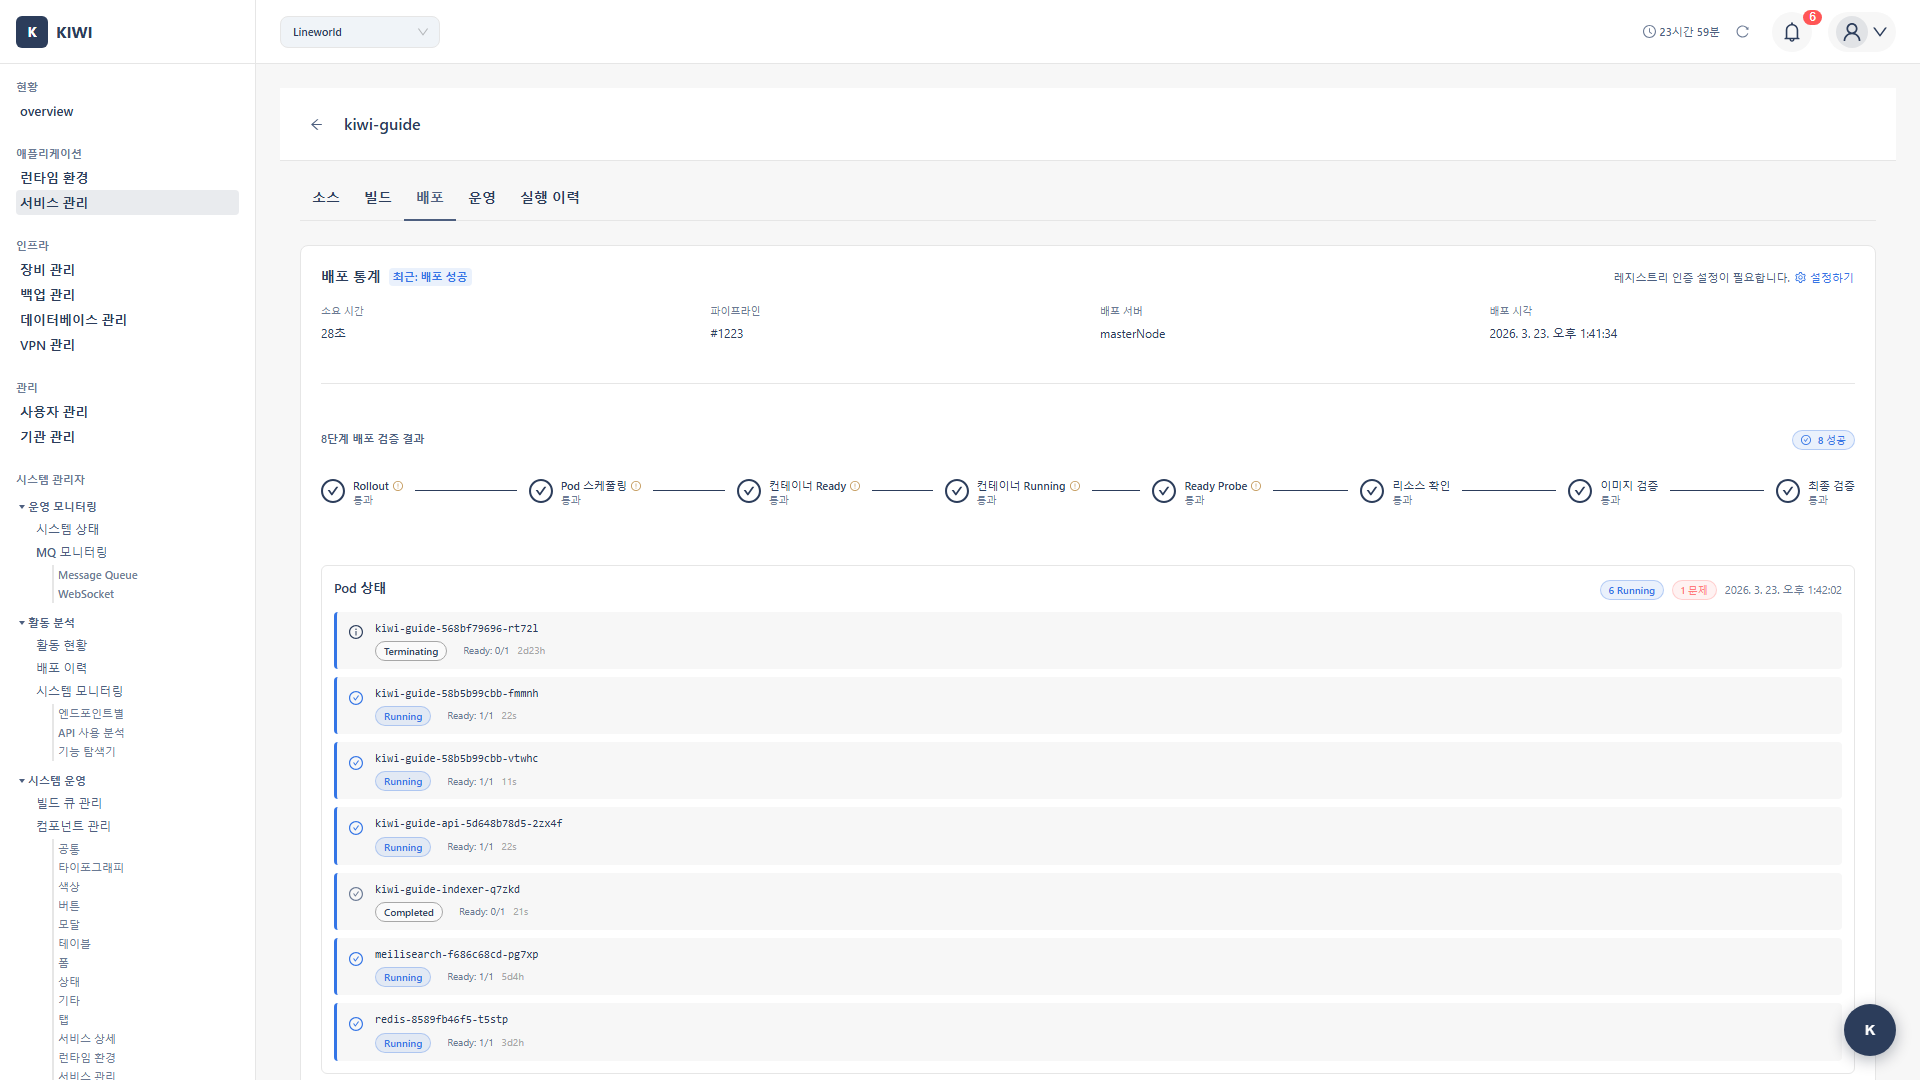
Step 1: Select the Deploy Tab
Click the Deploy tab at the top navigation.
Step 2: Select Deployment Target
Select the cluster to deploy to from registered runtime environments. Also select the environment:
- Development: Dev/test environment. 1 replica with low resources.
- Staging: QA/verification environment. Configured similar to production.
- Production: Live service environment. 2+ replicas with sufficient resources.
Step 3: Enter Deployment Settings
Enter the required deployment settings:
- Namespace: Kubernetes namespace (e.g.,
production) - Replica count: Number of Pod replicas (2+ recommended for availability)
- Resource limits: CPU/memory request and limit values .
- Environment variables: Database connection info, API keys, etc.
Step 4: Run First Deployment
Click the Deploy button. You can monitor deployment status in real time.
When deployment is complete, check that Pod status is Running on the [Runtime Environment] page. It's also good to access the service URL to verify normal operation.
Frequently Asked Questions
Git connection is failing
Symptoms and solutions:
- "Authentication failed": Check that the token hasn't expired and has
read_repositorypermission. - "Repository not found": Check that the URL ends with
.gitand has no typos. - "Connection timeout": Check firewall settings and GitLab server status.
Build is failing
Check the error message in the build log. Common causes:
- Dockerfile syntax errors (case sensitivity, whitespace)
- Base image inaccessible (network, authentication)
- Dependency installation failure (version conflicts, deleted packages)
Image push is failing
Check that registry authentication credentials are correct. You can test the registry connection in the service settings.
Pods are not starting after deployment
Check Pod event logs:
- ImagePullBackOff: Check image path/authentication .
- CrashLoopBackOff: Check application logs for startup errors .
- Pending: Check resource shortage, node selection conditions .
Next Steps
After service registration is complete, try these features:
- Security Scan Setup - Automatically scan for vulnerabilities during build
- Build/Deploy Advanced Settings - Auto build triggers, deployment strategies, and more
- Auto CI Setup - Auto build/deploy on code push