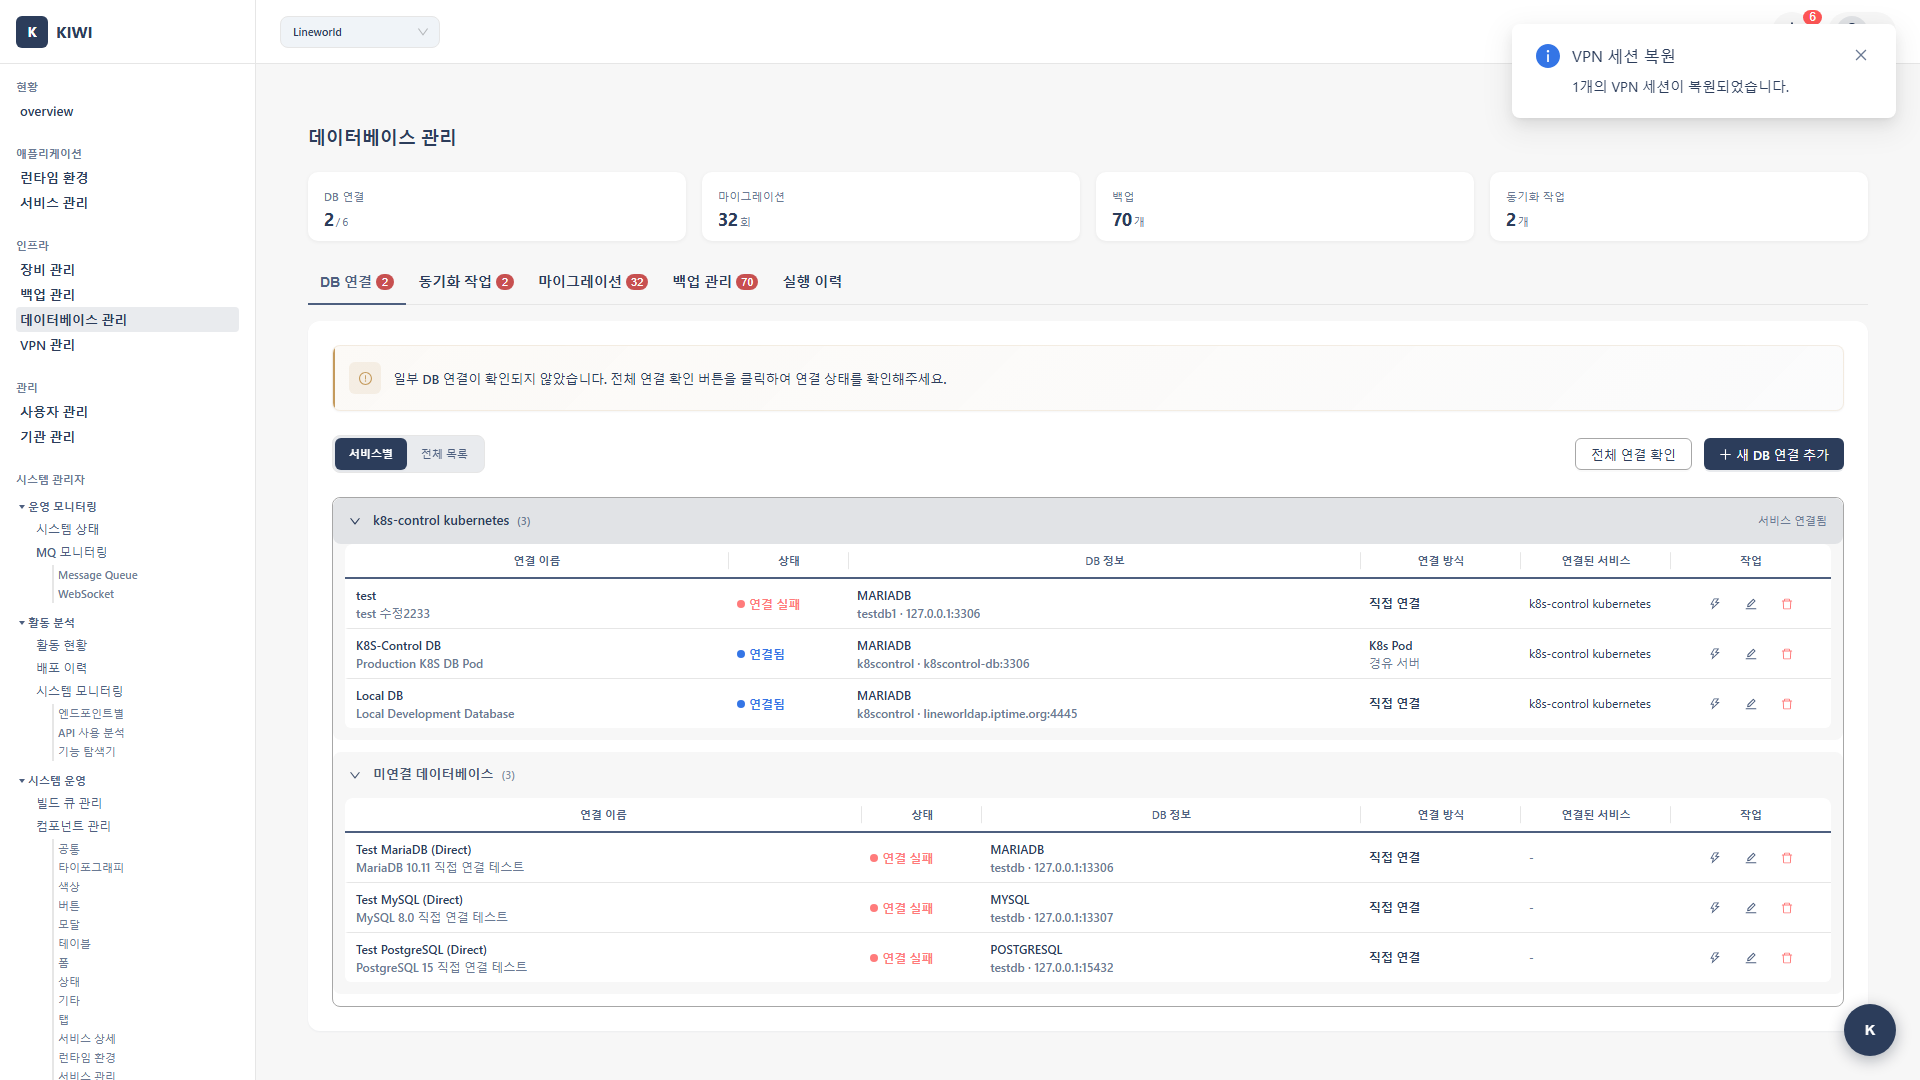
Database Management
Databases are the core of your services. With KIWI, you can manage multiple databases in one place and safely perform data synchronization and migrations.
Why Manage Databases with KIWI?
- Connection management: Manual work requires accessing each server to check. With KIWI, you can view status at a glance in the web UI.
- Data sync: Manual work requires writing scripts and setting up cron. With KIWI, you can configure with a few clicks.
- Migration: Manual work requires dump/restore operations. With KIWI, you get automated, safe migration.
- Monitoring: Manual work requires separate monitoring tools. With KIWI, you get unified management in the dashboard.
Supported Databases
- MySQL (5.7+): Supports sync, migration, and backup
- MariaDB (10.3+): Supports sync, migration, and backup
- PostgreSQL (12+): Supports sync, migration, and backup
- Oracle (12c+): Supports sync and migration.
-- MySQL/MariaDB
SELECT VERSION();

-- PostgreSQL
SELECT version();
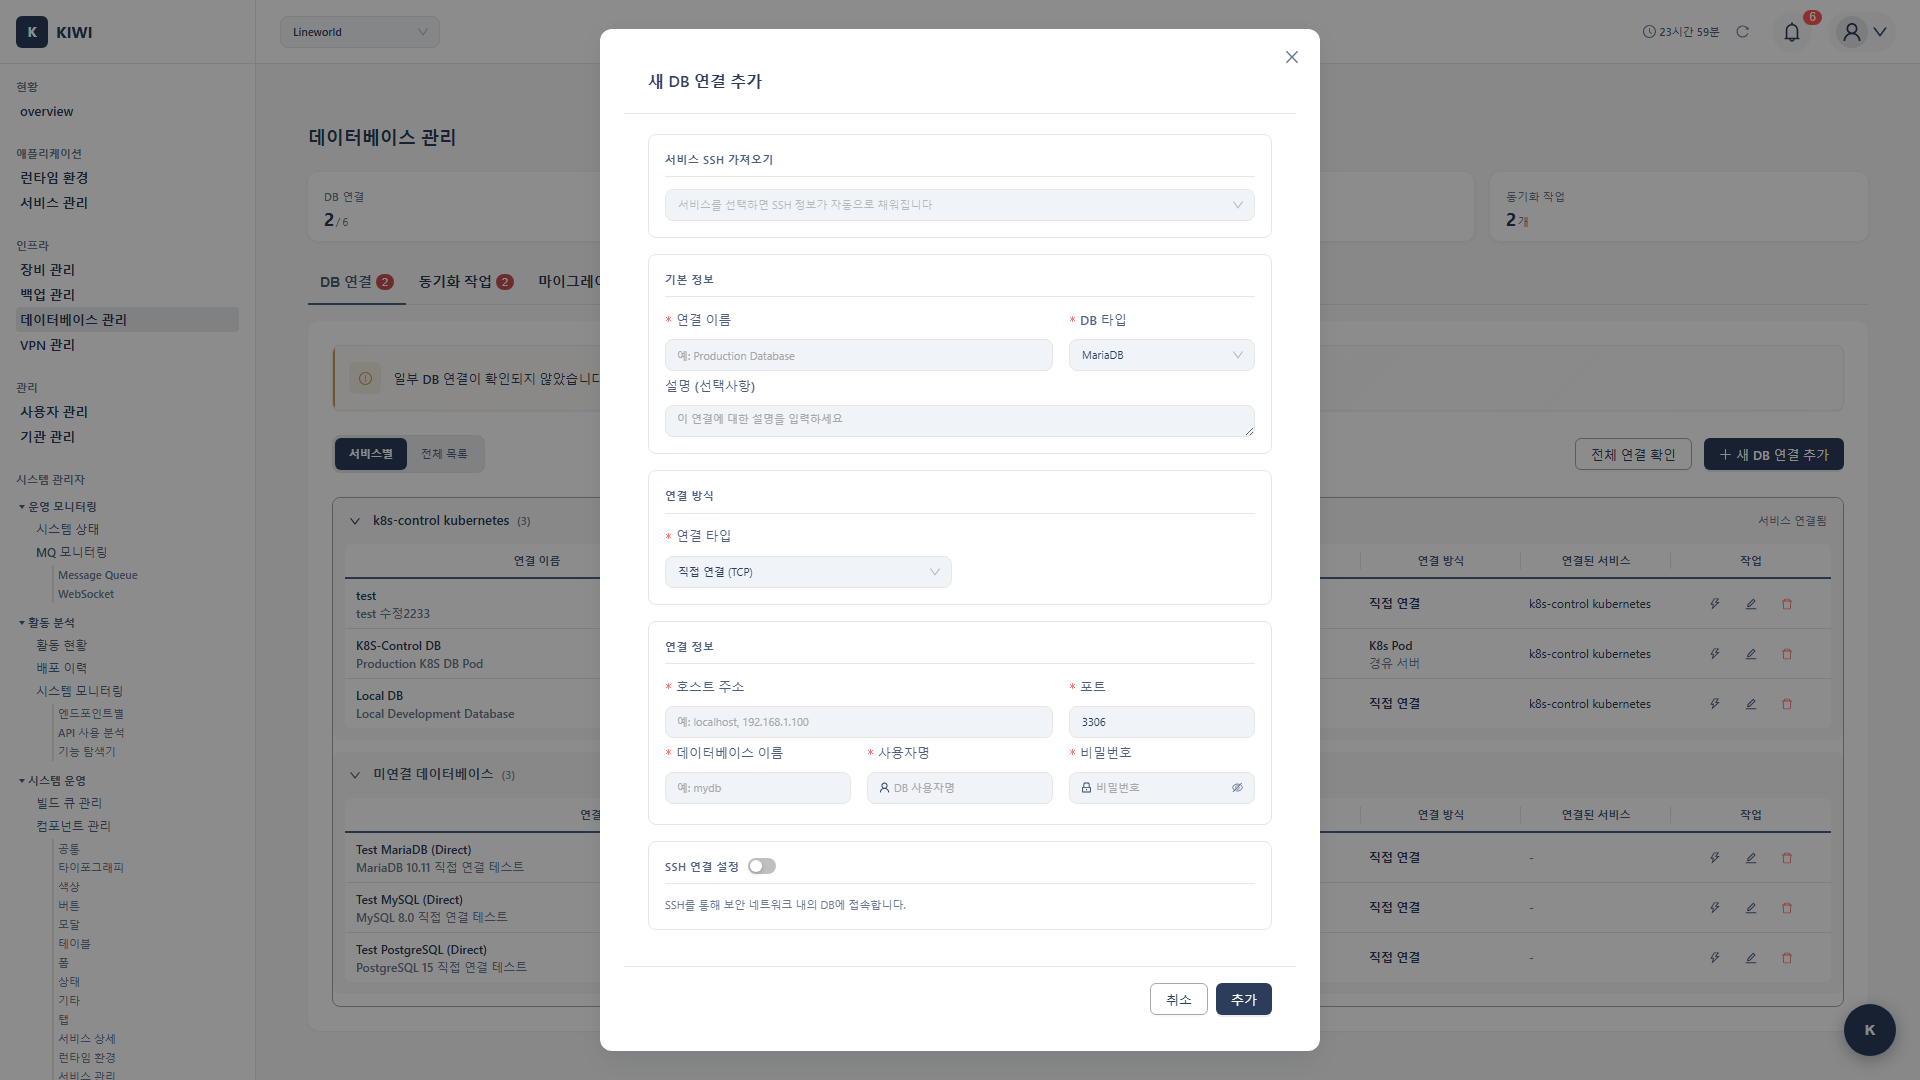
Registering a Database Connection
Register your active databases in KIWI. Once registered, you can monitor connection status, perform sync, and run migrations from the web UI.
Step 1: Start Adding a Connection
Click [Database Management] in the left menu, then click the Add Connection button.
Step 2: Select Database Type and Enter Connection Info
Select the database type and enter connection information:
- Connection name: An easily identifiable name. Example:
production-mysql - Host: The database server address. Example:
db.company.com - Port: The database port. Example: MySQL uses
3306, PostgreSQL uses5432 - Database name: The database to connect to. Example:
myapp - Username: The access account. Example:
admin - Password: The access password
Step 3: Advanced Settings (Optional)
Configure advanced settings if needed:
- Use SSL: Enables encrypted connection. Recommended for production and external networks.
- SSH tunnel: Access the database via SSH. Recommended for databases behind a firewall.
- Connection pool size: Number of concurrent connections. Default is 10, adjust based on load.
- Timeout: Connection timeout duration. Default is 30 seconds.
Always use SSL connections in production environments. Database credentials and data are encrypted in transit.
Step 4: Test Connection and Save
Click the Test Connection button to verify the connection. If successful, database version and connection info are displayed. Click Save to complete registration.
- Database server allows connections from your IP
- Firewall has database port open
- User has remote access permissions.
Setting Up a Database Synchronization Job
How to synchronize data between two databases.
Prerequisite: Both the source and target databases must be registered in KIWI.
Step 1: Navigate to the Sync Tab
Click the Sync tab at the top of the [Database Management] page.
Step 2: Create a New Sync Job
Click the Add Sync Job button.
Step 3: Configure Source and Target
Set the following information:
- Job name: A name to identify this sync job.
- Source DB: The database to pull data from.
- Target DB: The database to write data to.
- Sync direction: Choose between one-way (source to target) or bidirectional.
Step 4: Select Tables to Sync
Select the tables to synchronize:
- All tables: Synchronize all tables.
- Selected tables: Select and synchronize only specific tables.
- Excluded tables: Synchronize all tables except specific ones.
Step 5: Configure Sync Options
Set the sync behavior:
- Conflict handling: When there is a data conflict, choose source-first or target-first.
- Delete sync: Choose whether to delete data in the target when it is deleted from the source.
- Batch size: Number of records to process at a time. Default is 1000.
Step 6: Configure Schedule (Optional)
Set the synchronization frequency:
- Manual: Run only manually.
- Real-time: Synchronize changes in real time based on CDC (Change Data Capture).
- Scheduled: Synchronize regularly based on a cron schedule.
Step 7: Save and Run
Click the Save button. You can run the synchronization immediately with the Run Now button.
Running a Database Migration
How to migrate a database schema and data to a new server.
Step 1: Navigate to the Migration Tab
Click the Migration tab at the top of the [Database Management] page.
Step 2: Create a New Migration
Click the Create Migration button.
Step 3: Select the Migration Type
Select the scope of the migration:
- Schema only: Migrates only the DDL (table structure). Suitable for replicating development environments.
- Data only: Migrates only data. Used when the schema already exists.
- Full: Migrates both schema and data. Used for complete replication.
Step 4: Configure Source/Target
Set the following information:
- Source DB: The original database.
- Target DB: The destination database for migration.
- Target schema: The schema name in the target DB. (Optional)
Step 5: Configure Migration Options
Set the migration behavior:
- Foreign key check: Disable FK checks during migration to improve speed.
- Rebuild indexes: Rebuild indexes after migration.
- Include triggers: Choose whether to include triggers and procedures.
- Parallel processing: Set the number of concurrent processing threads.
Step 6: Preview the Migration
Click the Preview button to review:
- List of tables to be migrated.
- Estimated data size
- Estimated time required
Step 7: Execute Migration
Click the Start Migration button. You can view progress and logs in real time.
Viewing Database Monitoring
How to check the status of registered databases.
Step 1: Check Connection Status
Check the connection status of each database in the connection list on the [Database Management] page:
- Connected: Successfully connected.
- Disconnected: Connection has failed. Check the network or authentication credentials.
- Waiting: Attempting to connect.
Step 2: View Detailed Monitoring
Click a connection entry to view detailed information:
- Connection pool status
- Query execution statistics
- Last activity time
Connecting to a Database via SSH Tunnel
How to access a database behind a firewall.
Prerequisite: A server with SSH access must be registered in [Device Management].
Step 1: Add a Database Connection
Click the Add Connection button on the [Database Management] page.
Step 2: Enable SSH Tunnel
Check the Use SSH Tunnel checkbox.
Step 3: Enter SSH Settings
Enter the SSH tunnel information:
- SSH host: SSH server address for tunneling. (e.g.,
gateway.company.com) - SSH port: SSH port. (Default:
22) - SSH user: SSH access account.
- Authentication method: Choose between password or SSH key.
- Password: Enter the SSH access password.
- SSH Key: Upload an SSH private key file (.pem, .key).
- Local port: Tunnel port. Assigned automatically.
Step 4: Enter Database Connection Information
Use the internal address relative to the SSH server for the database host. (e.g., localhost or 192.168.x.x)
Step 5: Test Connection and Save
Both the SSH tunnel and database connection must succeed before you can save.
Frequently Asked Questions
Database connection is failing
- "Connection refused": Caused by port being blocked or service stopped. Solution: Check firewall and DB service status.
- "Access denied": Caused by authentication failure. Solution: Check username/password and permissions.
- "Host not allowed": Caused by remote access being denied. Solution: Enable access from that IP in the DB.
- "Connection timeout": Caused by network issues. Solution: Check network connectivity and firewall.
Synchronization is slow
Causes and solutions:
- Adjust batch size: Increase from default 1000 to larger (5000-10000)
- Check indexes: Ensure appropriate indexes exist on target tables.
- Network bandwidth: Data center-to-data center sync is bandwidth-sensitive.
- Parallel processing: Increase concurrent processing threads.
An error occurred during migration
- Foreign key error: Enable "Disable foreign key check" option.
- Data type mismatch: Check type mapping in migration preview
- Insufficient space: Check target DB disk space.
- Timeout: Reduce batch size for large tables.
SSL connection is not working
- Verify SSL is enabled on the database server.
- Check certificate files (CA, client certificate) are correct
- For self-signed certificates, use "Disable TLS certificate verification" option.
Related Guides
- Backup/Recovery - Database backup settings.
- Device Management - SSH server registration.