Kubernetes Deployment
This guide explains how to deploy built container images to a Kubernetes cluster. Kubernetes supports high availability, auto-recovery, and horizontal scaling, making it ideal for production environments.
- High Availability: Multiple Pods run simultaneously, so service continues even if one fails .
- Auto Recovery: Pods automatically restart if they become unhealthy
- Horizontal Scaling: Pod count can automatically increase or decrease based on traffic (HPA)
- Rolling Updates: Deploy new versions without service interruption .
Prerequisites
Before starting deployment, verify the following:
- Kubernetes cluster registered: K8s cluster must be registered on the [Runtime Environment] page
- Image build complete: Image must be pushed to the registry .
- Registry Secret created: Registry authentication Secret must exist in the K8s cluster .
You can automatically create a Registry Secret in Step 4 of Auto CI Setup.
Step 1: Go to Deploy Stage
- Navigate to the [Service Management] page
- Click on the service to deploy and go to the detail page
- Click the Deploy stage in the pipeline
Step 2: Select Deployment Environment
Select the environment to deploy to. Resources and settings may differ by environment.
- Development: Feature development and testing. Recommended replicas: 1.
- Staging: Final verification before deployment. Recommended replicas: 2.
- Production: Live service operation. Recommended replicas: 3 or more.
When deploying to production for the first time, verify the image has been sufficiently tested. We recommend validating in staging environment first if possible.
Step 3: Select Cluster and Namespace
Configure the deployment target:
- Cluster: K8s cluster to deploy to. (e.g.,
prod-cluster-01) - Namespace: K8s namespace to deploy to. (e.g.,
production,staging) - Image Tag: Image version to deploy. (e.g.,
main-abc123)
A namespace is a way to logically separate resources within a Kubernetes cluster. Separating namespaces by environment (dev, staging, prod) makes resource isolation and management easier.
Step 4: Deployment Settings
4.1 Replica Settings
Number of replicas is the count of Pods to run simultaneously.
- Development: 1 replica recommended. Saves resources.
- Staging: 2 replicas recommended. Provides basic redundancy.
- Production: 3 or more replicas recommended. Ensures high availability.
- Minimum 2: Service continues even if one Pod is updating or has failed .
- 3 or more: Better traffic distribution and stability .
- With HPA: Specify minimum replicas and count auto-adjusts based on traffic
4.2 Resource Settings
Configure CPU and memory to allocate to Pods.
- CPU Request: Minimum guaranteed CPU. (e.g.,
100m= 0.1 core) - CPU Limit: Maximum CPU usage. (e.g.,
500m= 0.5 core) - Memory Request: Minimum guaranteed memory. (e.g.,
128Mi) - Memory Limit: Maximum memory usage. (e.g.,
512Mi)
- Request: Used for Pod scheduling. Pod is placed on a node with this much available resources.
- Limit: Actual usage cap. Exceeding this causes CPU throttling or memory OOMKilled.
Recommendation: Set request based on average usage, limit based on peak usage
4.3 Environment Variable Settings
Configure environment variables needed by the application:
- Direct Input: Enter key-value directly. Recommended for simple config values.
- ConfigMap: Reference K8s ConfigMap. Recommended for environment-specific config.
- Secret: Reference K8s Secret. Recommended for passwords, API keys, and sensitive info.
Never directly enter sensitive information like passwords or API keys. Always use Secret. Directly entered values are stored as-is in deployment settings.
Step 5: Select Deployment Strategy
Choose how to deploy new versions.
- Rolling Update: Gradually replaces existing Pods. Pros: Zero-downtime, resource efficient. Cons: Temporary version mixing.
- Recreate: Terminates all existing Pods then creates new ones. Pros: Clean transition. Cons: Causes downtime.
- Blue-Green: Deploys new version separately then switches traffic. Pros: Fast rollback, complete isolation. Cons: Requires 2x resources.
- Development: Recreate recommended. Fast and simple.
- Staging: Rolling Update recommended. Simulates production behavior.
- Production: Rolling Update or Blue-Green recommended. Zero-downtime is required.
Rolling Update Advanced Settings
- maxSurge: Additional Pods that can be created during update. Default: 25%.
- maxUnavailable: Pods that can be terminated simultaneously during update. Default: 25%.
Example: 4 replicas, maxSurge=1, maxUnavailable=1 → Always maintains 3-5 Pods .
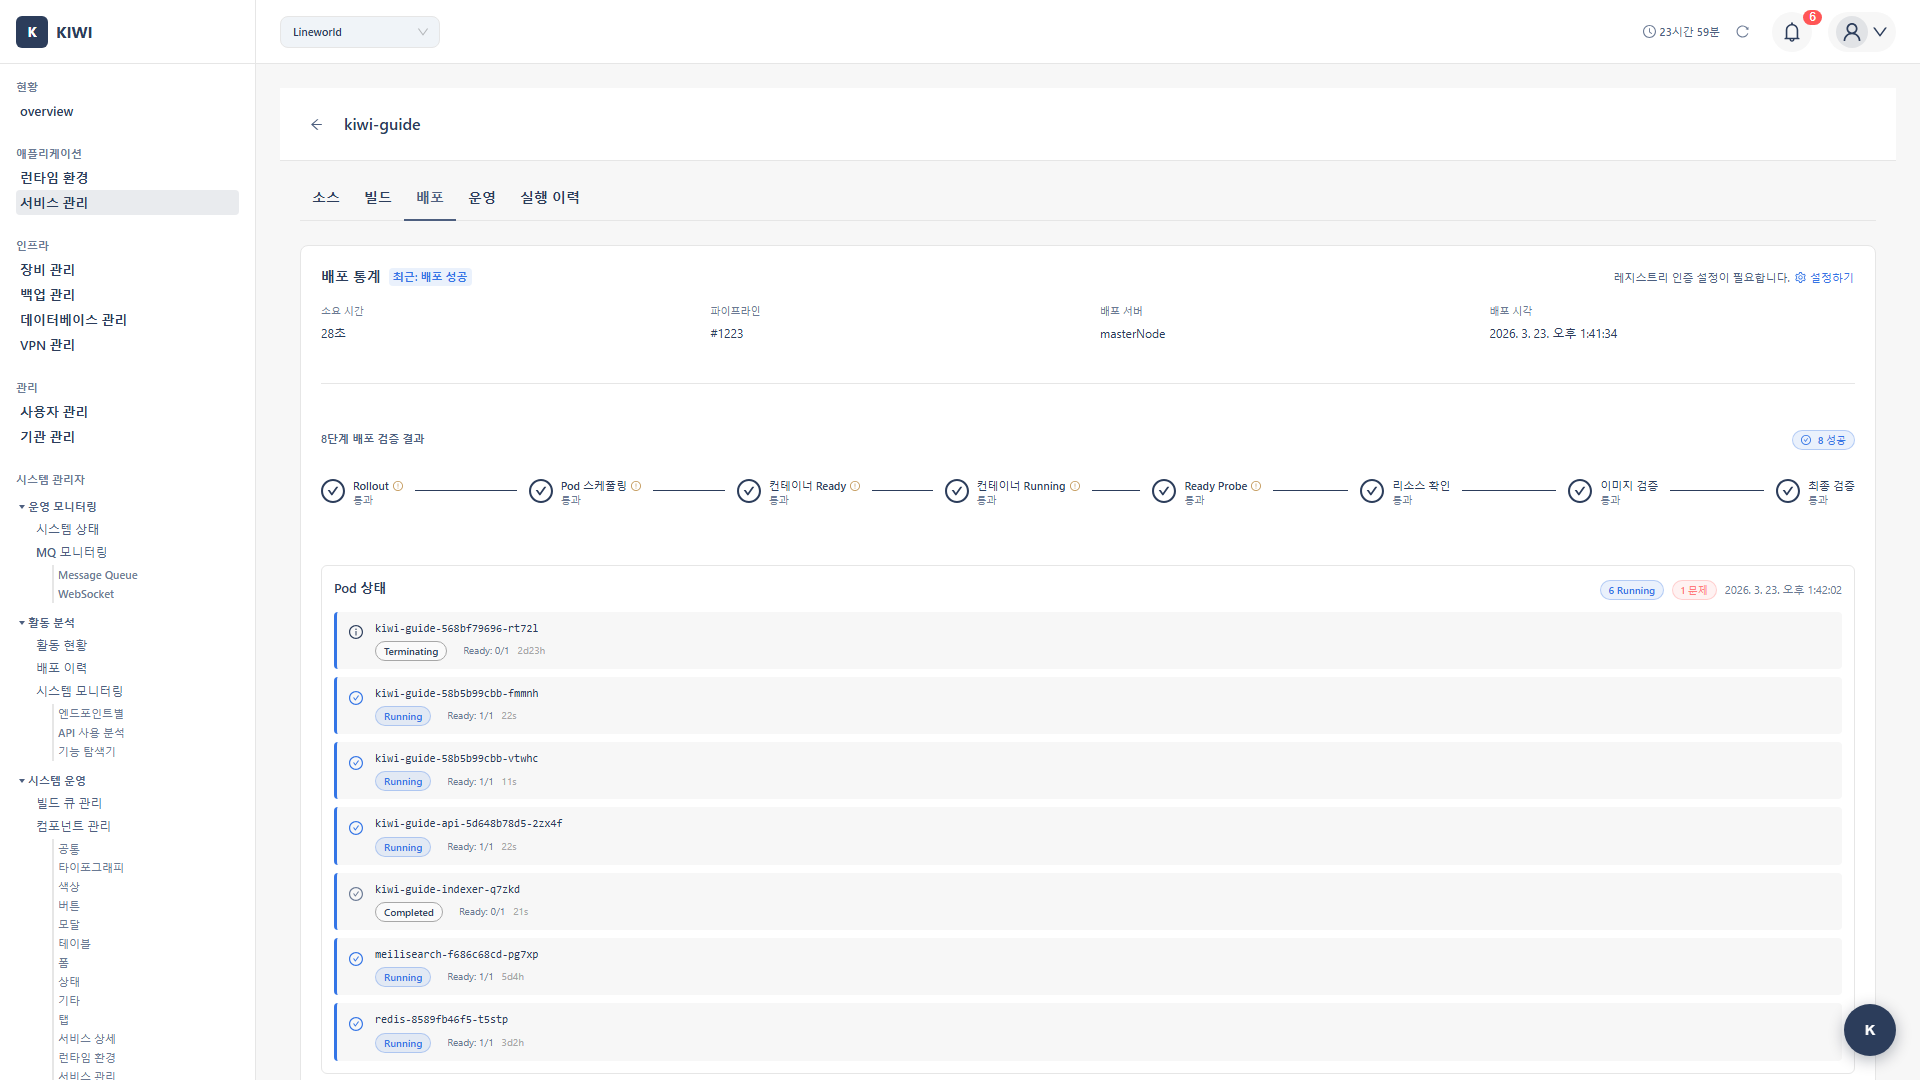
Step 6: Run Deployment
- Review all settings .
- Click the Deploy button .
- Monitor deployment progress .
Deployment Progress
[1/4] Creating Deployment...
[2/4] Waiting for Pods to be ready...
   → Pod my-app-xxx-1: Running (1/3)
   → Pod my-app-xxx-2: Running (2/3)
   → Pod my-app-xxx-3: Running (3/3)
[3/4] Updating Service...
[4/4] Deployment completed!
Pod startup time varies based on image size and application startup time. First deployment may take longer as image pulling is required.
Step 7: Check Deployment Status
Understanding Pod Status
- Running: Running normally. No action required.
- Pending: Waiting for scheduling. Check node resources or image pull status.
- CrashLoopBackOff: Repeatedly crashing. Check logs to identify the issue.
- ImagePullBackOff: Image pull failed. Check Registry Secret or image tag.
View Details
The following is available in the Operate stage:
- K8s Pods: Pod list, status, resource usage.
- K8s Resources: Deployment, Service, ConfigMap, etc.
- K8s Deployment: Rollout status, revision history.
- Logs: Real-time Pod logs.
HPA (Horizontal Pod Autoscaler) Setup
Set up HPA to automatically adjust Pod count based on traffic.
Horizontal Pod Autoscaler is a Kubernetes feature that automatically increases or decreases Pod count based on CPU and memory usage. It automatically scales out during traffic spikes and scales down when traffic decreases to save resources.
How to Create HPA
- Go to Operate stage → K8s Deployment tab
- Click the HPA Settings button .
- Enter settings:
- Min Replicas: Minimum Pods when scaling down. Recommended value: 2.
- Max Replicas: Maximum Pods when scaling up. Recommended value: 10.
- CPU Target: CPU usage target. Recommended value: 70%.
- Memory Target: Memory usage target (optional). Recommended value: 80%.
- Set minimum replicas to 2+ to always maintain redundancy
- Setting CPU target around 70% allows headroom for burst traffic
- Scale-up/down speed is gradual by default, so consider pre-warming for sudden traffic changes .
Domain Settings (Ingress)
Configure a domain to allow external access to your service.
Create Ingress
- Go to Operate stage → Domain Settings tab
- Enter domain information:
- Host: Domain name. (e.g.,
api.company.com) - Path: URL path. (e.g.,
/,/api) - TLS: Enable HTTPS. (Recommended)
For details, see the Domain/SSL Setup guide.
Troubleshooting
Pods Not Starting
- Pending (Insufficient resources): Check node resources and reduce request values if needed.
- Pending (Waiting for image pull): Check Registry Secret configuration.
- ImagePullBackOff: Image not found. Verify image tag and Registry access permissions.
- CrashLoopBackOff: Application error. Check
kubectl logsor KIWI Logs tab.
Deployment Failure
- Namespace not found: Create namespace first
- Insufficient permissions: Request RBAC permissions from cluster admin
- ResourceQuota exceeded: Check resource quota or adjust request values .
Cannot Access Service After Deployment
- Pod not Ready: Check Health Check settings and application .
- Service configuration error: Verify port mappings .
- Ingress not configured: Create Ingress or configure domain
Check real-time logs in the Logs tab under Operate stage. Most issues can be diagnosed from application logs.
Related Guides
- Rollback - Restore to previous version when issues occur
- Docker Deployment - Docker/Podman runtime deployment .
- Operations Management - Pod monitoring, log viewing .