Device Management
Path: /devices
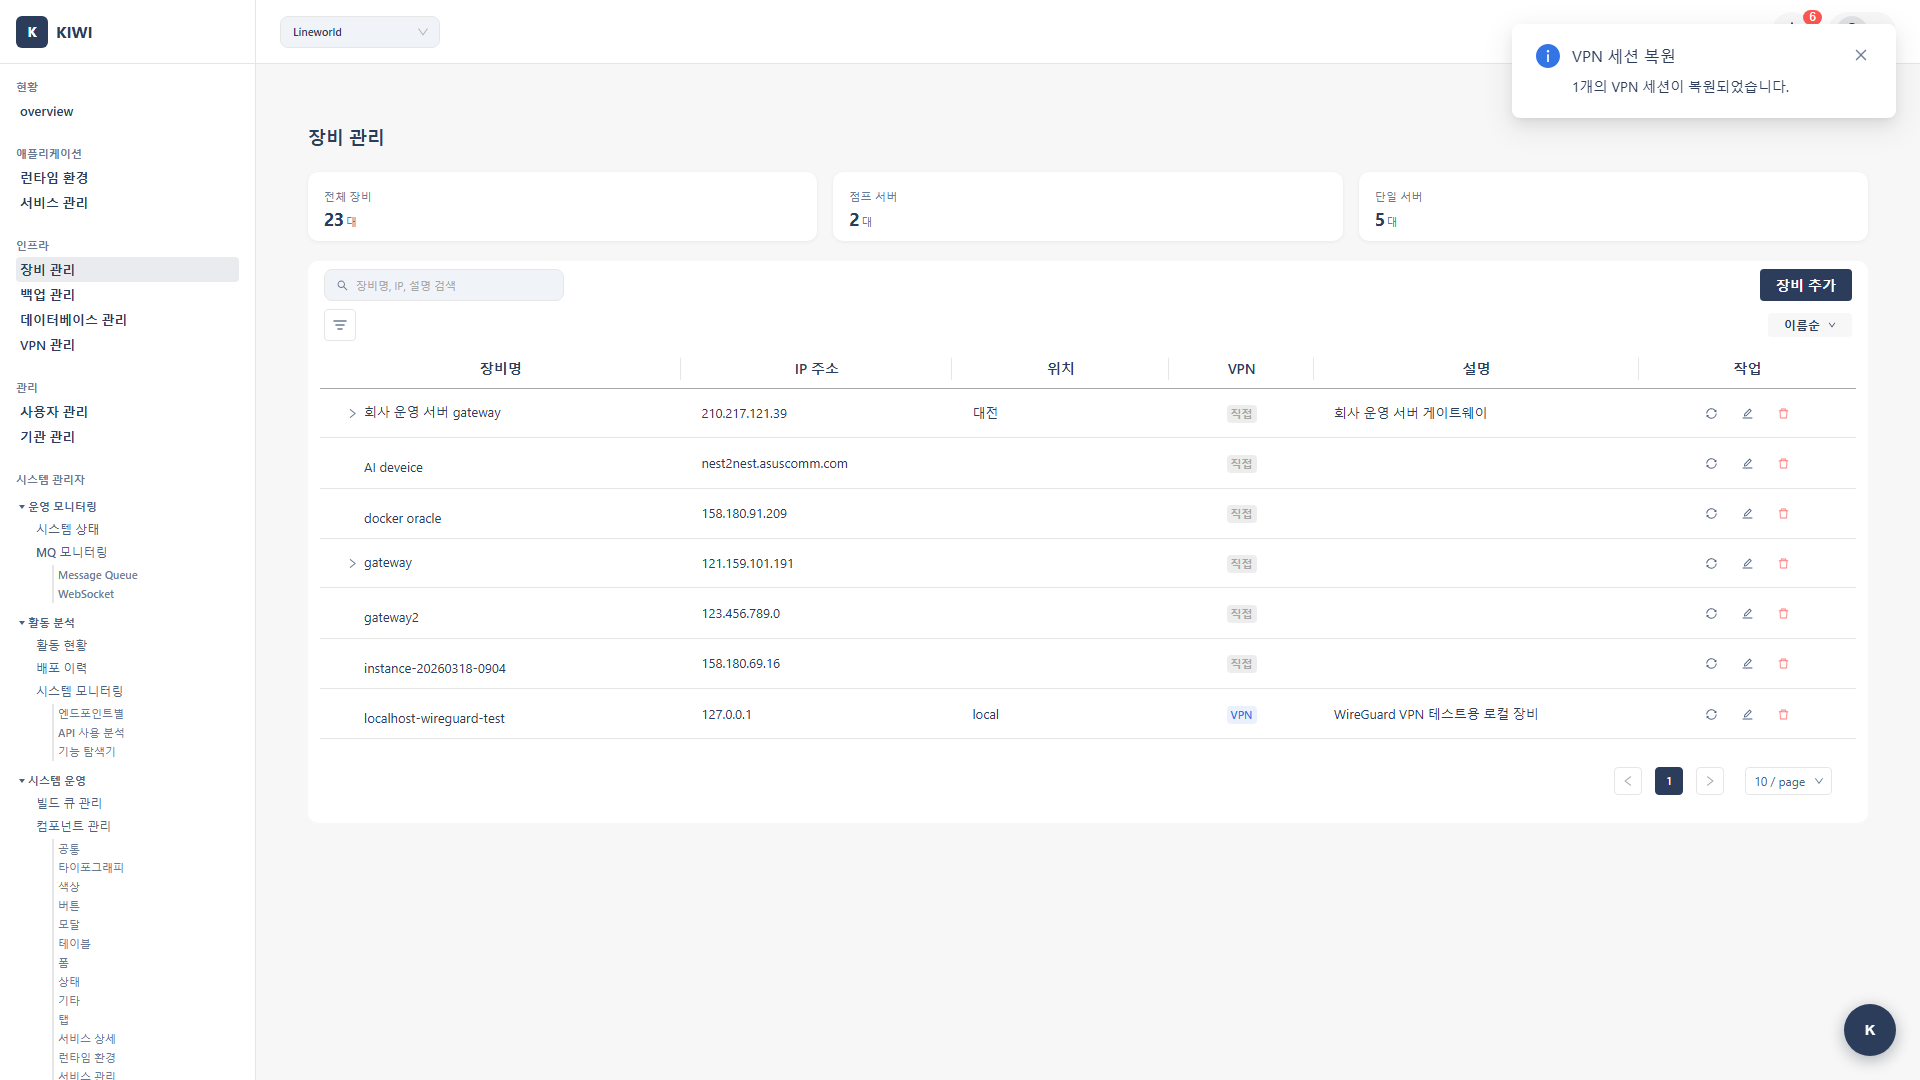
To deploy and operate services in KIWI, you first need to register your infrastructure devices. The [Device Management] page allows you to register and manage various infrastructure devices such as VMs and bare-metal servers.
If you cannot access this page, please request permission from your organization administrator. Device management requires admin privileges as it directly affects the infrastructure.
Why Do You Need to Register Devices?
KIWI performs the following tasks based on registered devices:
- Runtime Environment Setup: Connect runtimes like Docker and Kubernetes to registered devices.
- Automated Deployment: Automatically deploy services to registered devices after builds.
- Monitoring: Monitor device resource usage in real-time
- Backup Management: Back up containers and data on devices.
Prepare the following information before registering a device:
- Server IP address and SSH port (default is 22)
- SSH-accessible user account credentials (password or SSH private key file)
- Jump server information if the server is behind a firewall
Key Features
Device Registration
Register servers in KIWI by entering SSH connection information. Registered devices can be connected as Kubernetes cluster nodes or Docker hosts on the [Runtime Environments] page.
SSH (Secure Shell) is a protocol for securely accessing remote servers over a network. It provides excellent security through encrypted communication and is the standard method for server management. The default port is 22, but other ports are often used for security purposes.
SSH Multi-Hop (Jump Server Relay)
In security-enhanced networks, you cannot directly access internal servers from outside. In such cases, you need to go through a Jump Server.
User PC → Jump Server (Public IP) → Internal Server (Private IP)
KIWI automatically handles such multi-hop connections. Simply specify the parent device, and KIWI will set up the relay connection for you.
- When accessing servers behind a firewall
- When accessing servers in a private network (private IP)
- When direct access is blocked due to security policies.
VPN Integration
Servers accessible only via VPN can also be managed in KIWI. Link a VPN profile to a device, and KIWI will automatically connect through the VPN tunnel.
Automatic System Information Collection
Collect hardware information from registered devices automatically via SSH. You can easily assess your infrastructure status without installing any additional agents.
- OS: Operating system type and version. Example: Ubuntu 22.04 LTS.
- CPU: Processor model and core count. Example: Intel Xeon 8 cores.
- Memory: Total RAM capacity. Example: 32GB.
- Disk: Storage capacity and usage. Example: 500GB (45% used).
UI Layout
Search and Filters
As your device count grows, finding specific devices becomes challenging. KIWI provides various search and filter features.
- Search: Search by device name or IP address. Usage example: "web-server" or "192.168.1".
- VPN Filter: Filter by VPN connection status. Usage example: View VPN devices only, Direct connection only.
- Location Filter: Filter by device location. Usage example: "Seoul IDC", "Busan Center".
Device List
Information visible at a glance in the device list:
- Name: Name for identifying the device (e.g., prod-web-01).
- IP Address: Server IP and SSH port (e.g., 192.168.1.100:22).
- Location: Physical/logical location of the device.
- VPN Profile: Connected VPN (direct connection if none).
- Runtime: Installed runtime environment (Docker, K8s, etc.).
- System Info: OS, CPU, Memory, Disk information.
Hierarchical Display
Parent-child device relationships are visualized in a tree structure. You can see at a glance the relationship between jump servers and their connected internal servers.
📦 jump-server (210.1.1.100)
├── 📦 internal-web-01 (192.168.1.10)
├── 📦 internal-web-02 (192.168.1.11)
└── 📦 internal-db-01 (192.168.1.20)
How to Use
Registering a Device
Here's how to register a new server in KIWI.
Step 1: Open the Add Menu
Click the Add dropdown button at the top of the screen.
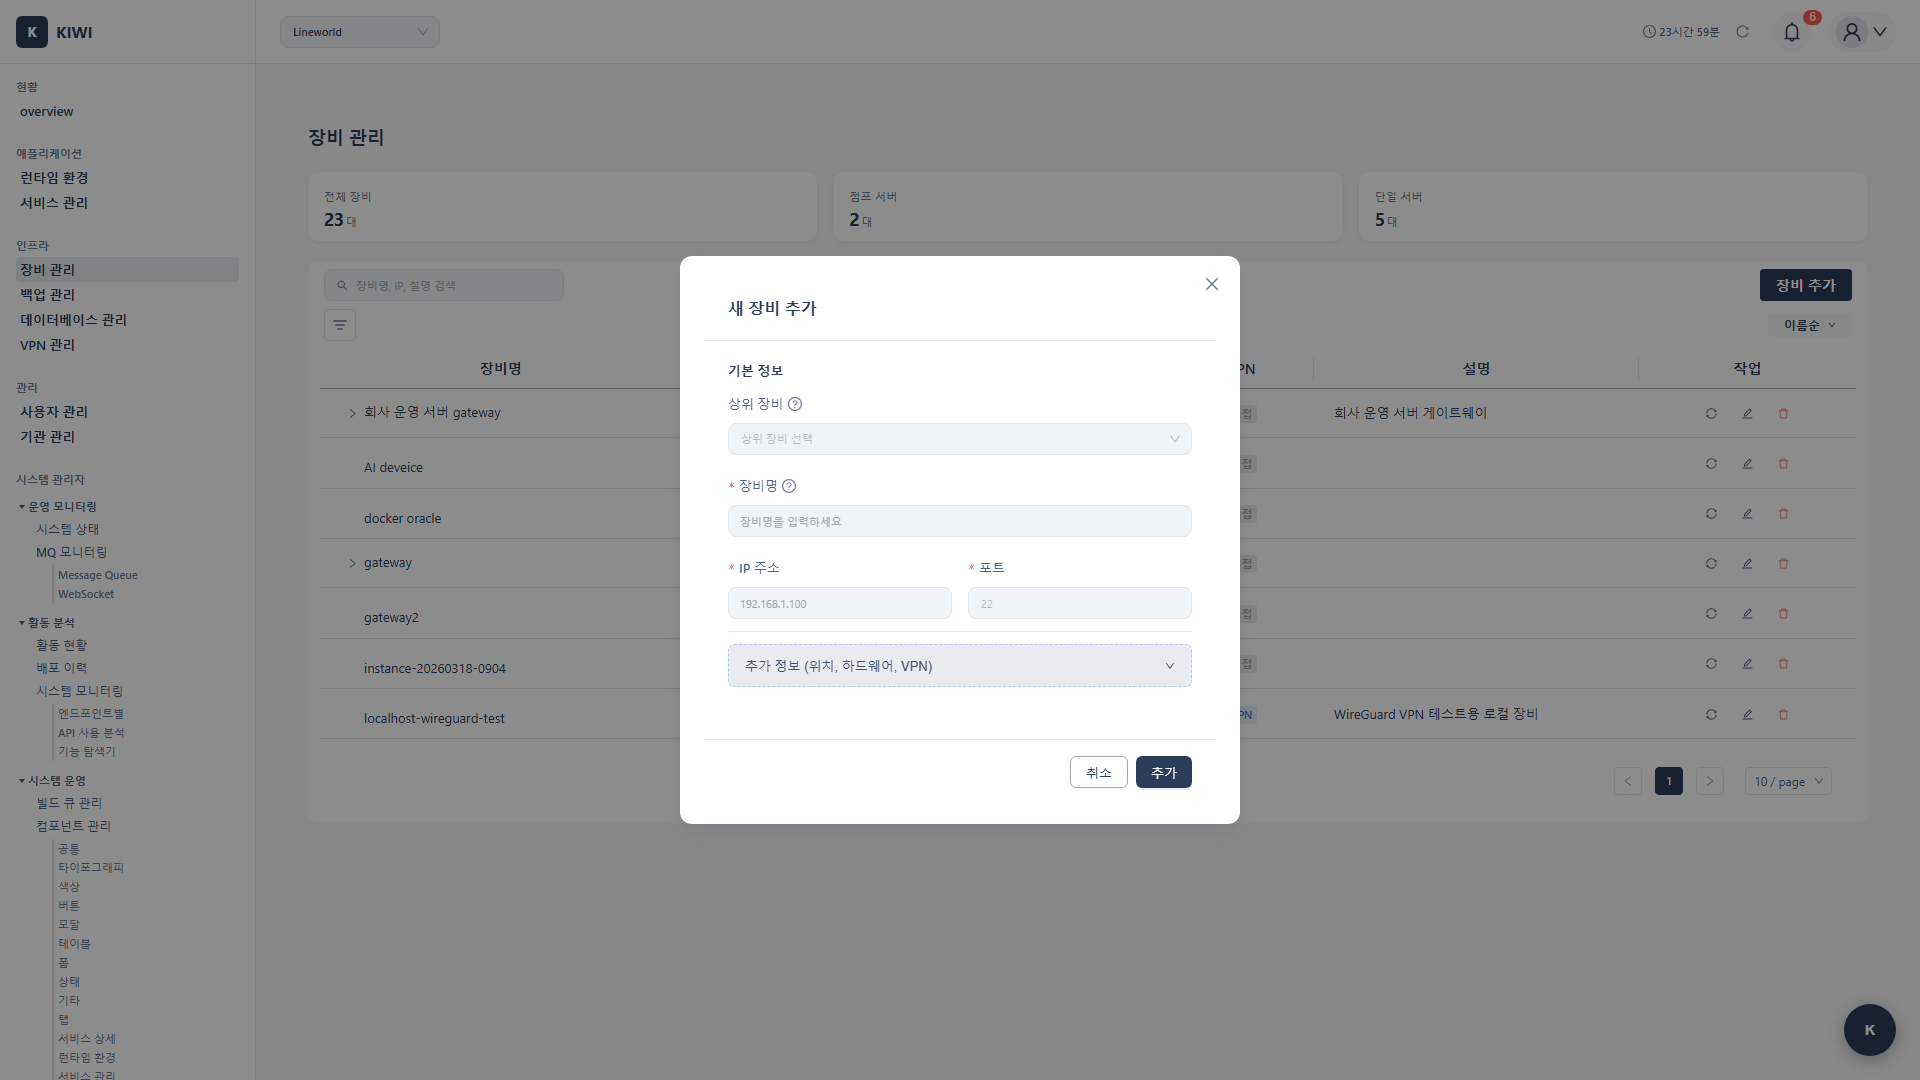
Step 2: Select Add Device
Select Add Device from the dropdown menu to open the input modal.
Step 3: Enter Basic Information
- Parent Device (Optional): Jump server to route through. Leave empty if directly accessible.
- Device Name (Required): Identifiable name. Recommend format: purpose-env-number (e.g., web-prod-01).
- IP Address (Required): Server IP address. Enter private IP if using parent device.
- Port (Required): SSH port number. Default is 22, enter actual port if changed.
- Location (Optional): Device location info. Recommended for easier management.
- VPN Profile (Optional): Select for VPN integration. Leave empty if accessible without VPN.
- Description (Optional): Device description. Notes about purpose, owner, etc.
Step 4: Complete Registration
After entering all information, click the Add button to register the device.
Using consistent naming conventions makes device management much easier:
web-prod-01: Web server, production environment, number 1db-dev-master: DB server, development environment, master.jump-seoul: Jump server, Seoul location.
Configuring SSH Multi-Hop
Set up internal network servers to be accessed through a jump server.
Step 1: Register the Jump Server (Parent Device) First
Register the jump server that is directly accessible from outside. Leave the Parent Device field empty for this device.
Step 2: Register the Internal Server (Child Device)
When registering the internal server, select the jump server from Step 1 in the Parent Device dropdown.
Step 3: Verify the Connection Path
Once registration is complete, the device list displays the hierarchy. KIWI automatically routes through the jump server for SSH connections.
When using multi-hop, SSH credentials are required for each device in the chain. Prepare account information (password or SSH key) for both the jump server and internal servers. Each hop can use a different authentication method.
Editing a Device
Modify information for registered devices.
- Find the device you want to modify in the device list
- Click the Edit button (pencil icon) for that device.
- Modify the information and click the Save button.
Deleting a Device
Delete devices that are no longer in use.
- Find the device you want to delete in the device list
- Click the Delete button (trash icon) for that device.
- Click Delete in the confirmation dialog
- Deleted devices cannot be recovered
- Child devices will be deleted together if the parent is deleted.
- May affect connected runtime environments or service deployments.
Detailed Feature Guides
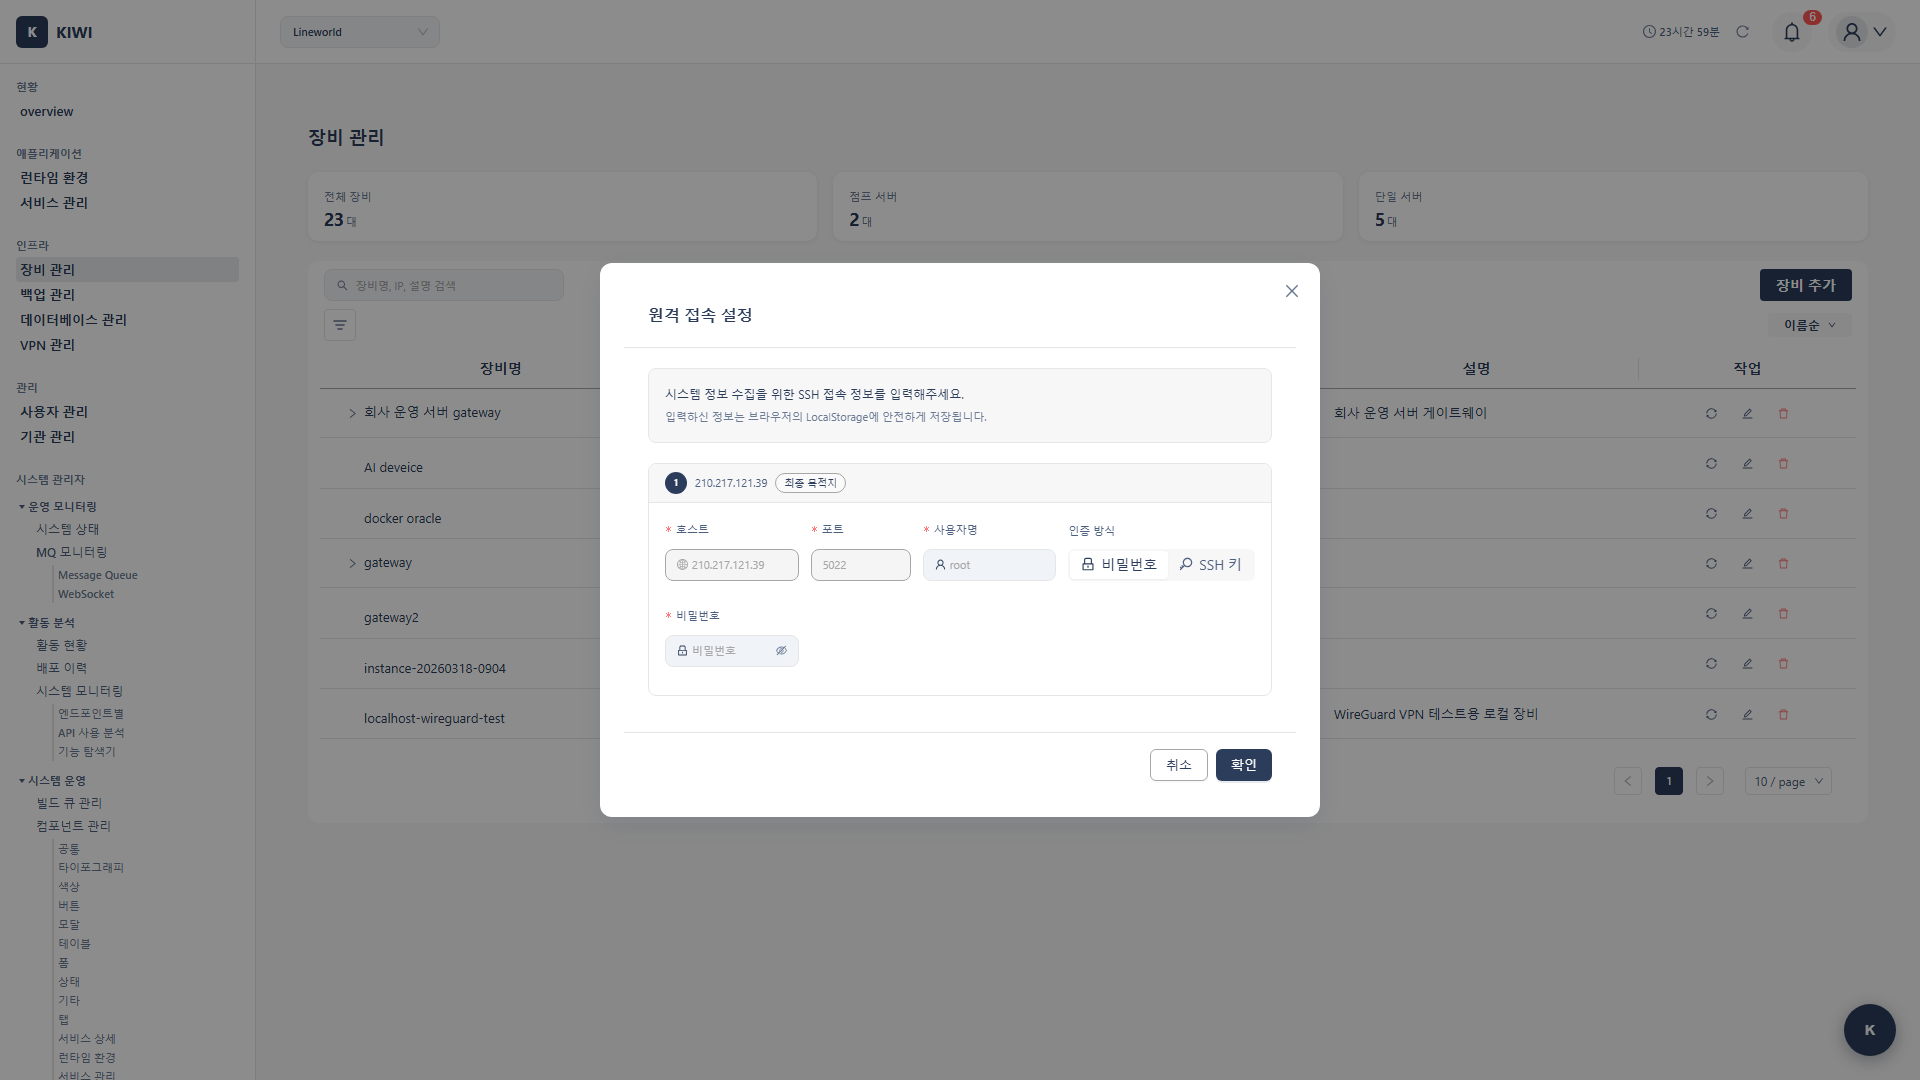
Collecting System Information
Collect hardware information from devices to assess your infrastructure status.
- Click the Collect icon for the device you want to gather information from
- An SSH credentials input modal appears.
- Select the authentication method and enter credentials:
- Password authentication: Enter the username and password
- SSH Key authentication: Enter the username and upload an SSH private key file (.pem, .key)
- Click the Collect button to automatically gather OS, CPU, Memory, and Disk information.
Re-collect system information when server specs change or when you want to check disk usage. The information will be updated to the latest status.
Using as a Docker Host
How to use a registered device as a Docker runtime.
- Register the device on the [Device Management] page
- Navigate to the [Runtime Environments] page
- When adding a Docker runtime, select the registered device as the host
VPN Integration
Register devices that are only accessible through VPN.
- Open the device registration or edit screen
- Select the VPN to use from the VPN Profile dropdown
- Use the Test Connection button to verify connectivity through the VPN tunnel
- Click the Save button once the connection succeeds.
Glossary
- VM (Virtual Machine): A virtual computer implemented in software on physical hardware. Multiple VMs can run on a single physical server.
- Bare-metal Server: A server with the OS installed directly on physical hardware without virtualization. Suitable for performance-critical workloads.
- SSH Port: Network port used for SSH connections. Default is 22, but it's often changed to other ports for security.
- Jump Server: A relay server for accessing internal networks. Also called a Bastion Host.
- VPN Tunnel: An encrypted virtual private network connection path. Safely access private networks through the public internet.
Frequently Asked Questions
Q: Connection fails after device registration.
Check the following:
- Verify the IP address and port are correct
- Ensure the port is open in the firewall
- If a jump server is needed, verify the parent device is configured.
Q: System information collection fails.
If SSH connects but information collection fails:
- Check if the account has permission to execute system commands.
- Some commands may require sudo privileges.
Q: Can I delete only child devices without deleting the parent?
Yes, child devices can be deleted independently. However, be careful that deleting a parent device will also delete all its child devices.