Database Management
Path: /database
Connect external databases to KIWI and manage data synchronization and restoration. This page allows you to centrally manage multiple databases and set up automated synchronization tasks.
If you cannot access this page, please request Database Management permission from your organization administrator.
Why Do You Need Database Management?
In a DevSecOps environment, you need to manage databases across multiple environments such as development, testing, and production. With KIWI's database management features, you can:
- Centralized Management: Securely manage multiple DB connection credentials in one place.
- Automated Synchronization: Maintain data consistency by regularly syncing data between environments.
- Quick Recovery: Rapidly restore to a specific point in time when issues occur
- Enhanced Security: Secure DB access through SSH tunneling and SSL connections.
Supported Databases
Check the database types and features supported by KIWI.
- MySQL (5.7+): Supports Connect, Sync, and Restore. Most widely used database.
- MariaDB (10.3+): Supports Connect, Sync, and Restore. MySQL compatible.
- PostgreSQL (12+): Supports Connect, Sync, and Restore. Offers advanced features.
- Oracle (12c+): Supports Connect and Sync only. Restore is not supported.
MySQL and MariaDB have high compatibility and use the same driver. Applications developed for MySQL will mostly work with MariaDB as well.
Key Features
Connection Management
Core features for registering and managing database connections.
- Register Connection: Save new DB connection info. Use when adding a new DB.
- Connection Test: Immediately verify connectivity. Use before registration or when troubleshooting.
- SSL/TLS Connection: Encrypted secure connection. Use for external network communication (recommended).
- SSH Tunneling: Bypass firewall connection. Use when accessing DB behind firewalls.
SSH tunneling forwards database traffic through an SSH connection. It allows secure access to internal network databases through a jump server (bastion host).
Synchronization Tasks
Synchronize data between source and target databases. Use it to copy production data to development/testing environments or for backup purposes.
- Manual Sync: Execute once immediately. Recommended for testing or emergency situations.
- Automatic Sync: Run repeatedly on schedule. Recommended for regular data updates.
- Full Sync: Synchronize all tables. Recommended for initial setup or full replication.
- Selective Sync: Sync only specified tables. Recommended when specific data is needed.
- Source-first: Overwrites target DB with source DB data (potential data loss)
- Target-first: Keeps target DB data on conflict (ignores source changes)
Always test before applying to production environments!
Data Restore
Restore data to a specific point in time using backup files or snapshots.
Migration
Features for migrating or upgrading databases to different environments.
- Schema Migration: Migrate database structure including tables, indexes, and constraints. Use for new environment setup or version upgrades.
- Data Migration: Transfer actual data from source to target DB. Handles large datasets safely.
- Validation: Automatically validates data integrity before and after migration. Checks for missing or modified data.
- Rollback Support: Revert to previous state if migration fails. Enable backup option to automatically backup before proceeding.
- Migration: One-time transfer operation. Use for dev→staging→prod environment transfers, DB server replacement, etc.
- Synchronization: Repetitive data replication. Use for keeping data up-to-date on a regular basis.
DB Backup Management
Features for directly backing up and restoring databases. You can backup DB data separately from KIWI's infrastructure backups (etcd, Docker).
- Manual Backup: Create backup immediately. Use to preserve current state before important operations.
- Scheduled Backup: Automatically backup on schedule. Set your preferred frequency like daily at midnight, every Sunday, etc.
- Retention Policy: Automatically delete old backups. Set retention period (e.g., 30 days) or retention count (e.g., keep last 10).
- Point-in-time Restore: Select and restore from a specific point in the backup list.
- DB performance may temporarily degrade during backup
- Large DB backups may take significant time, so run during low-traffic periods.
- Production DB backups are recommended during off-peak hours (early morning)
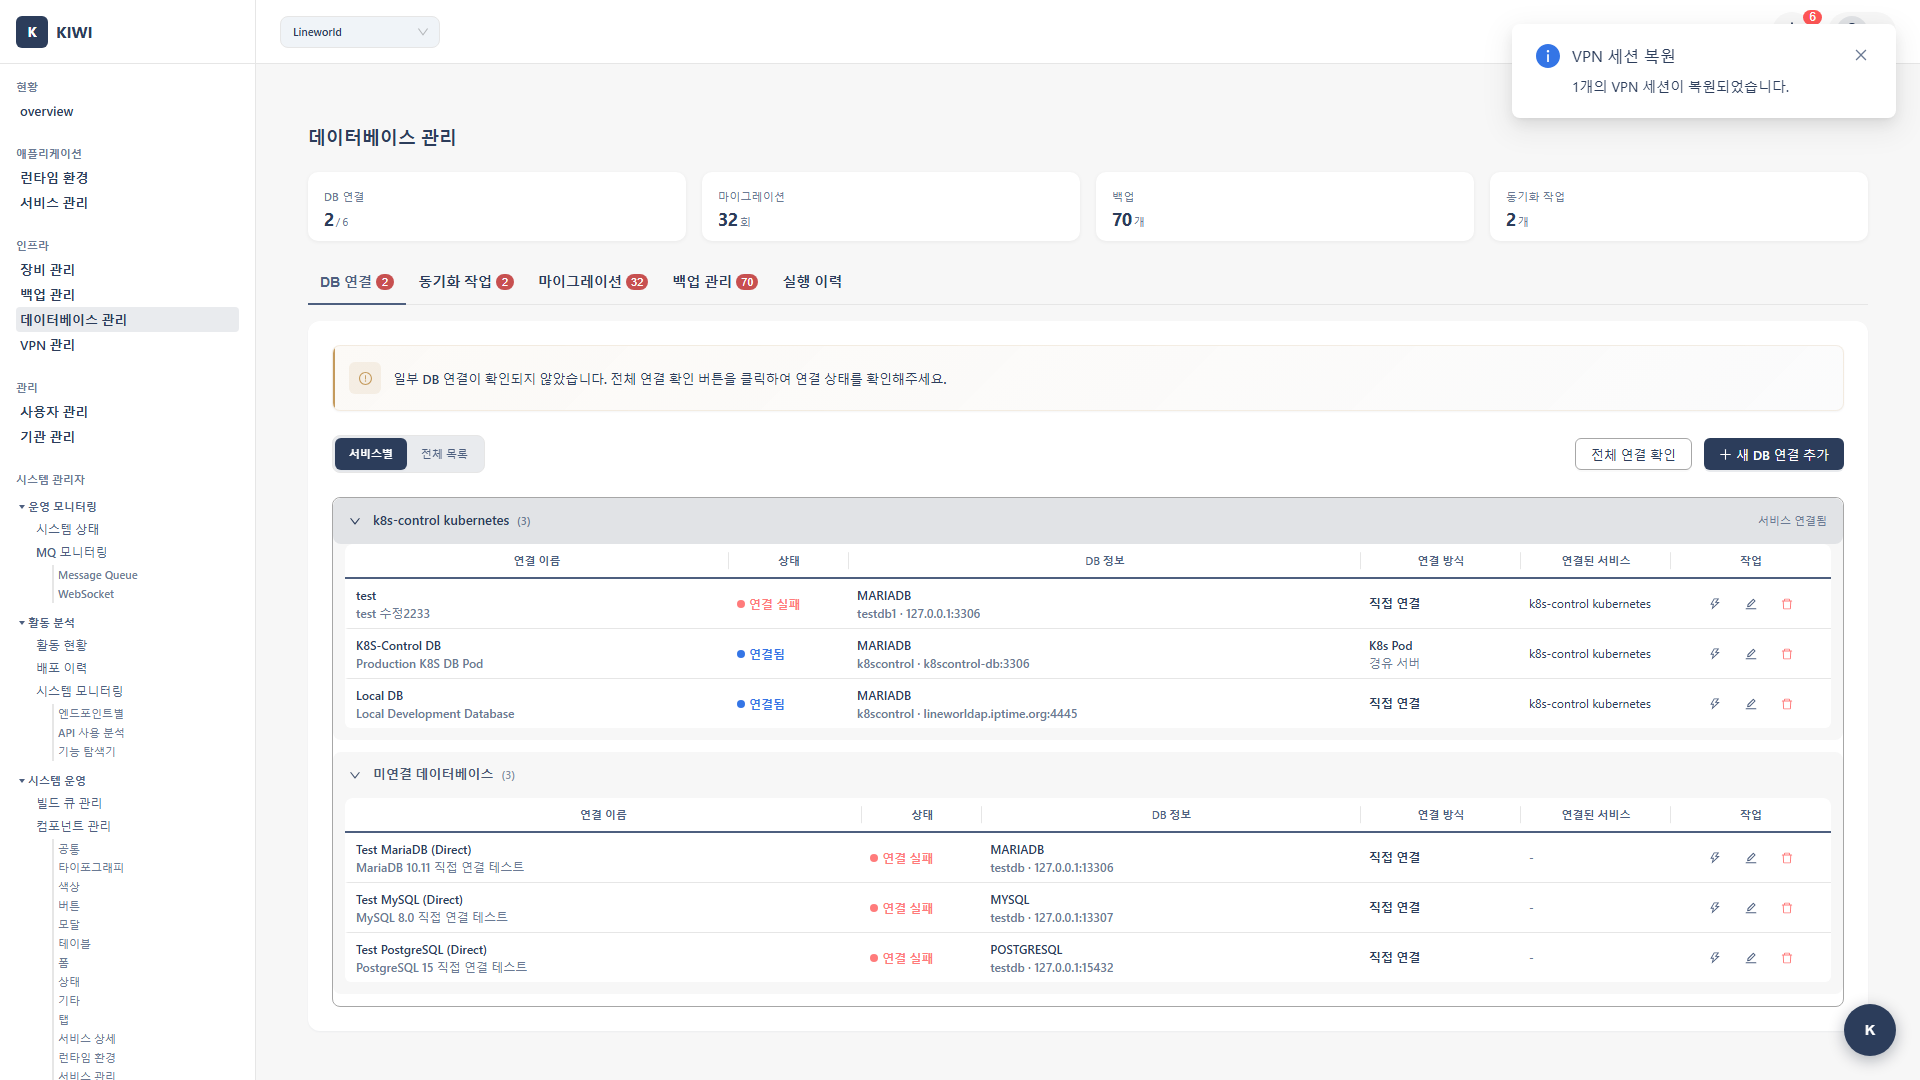
UI Layout
The Database Management page consists of 5 tabs. Tab visibility may vary based on user permissions.
- DB Connection: Register and manage database connections. View connection list, status, type, and add new connections.
- Sync Tasks: Configure and run synchronization between two DBs. View task list, schedule, and next run time. (Sync permission required)
- Migration: Migrate database schema and data to different environments. Schema comparison features are also available in this tab. (Migration permission required)
- Backup Management: Create and restore DB backups. Manage scheduled backup settings and restore history.
- Execution History: View execution records for all operations including sync, migration, and backup/restore. Shows execution time, result, and error messages.
Sync Tasks and Migration tabs are only visible to users with corresponding permissions. If you don't see these tabs, request permissions from your organization administrator.
Information in the Connection List
- Name: An easily identifiable name for the connection (e.g., "ProdDB", "DevDB")
- Type: MySQL, MariaDB, PostgreSQL, etc.
- Host: DB server address.
- Port: DB port number.
- Connection Status: Current connectivity (green: normal, red: unreachable)
How to Use
1. Registering a DB Connection
Here's how to register a new database connection.
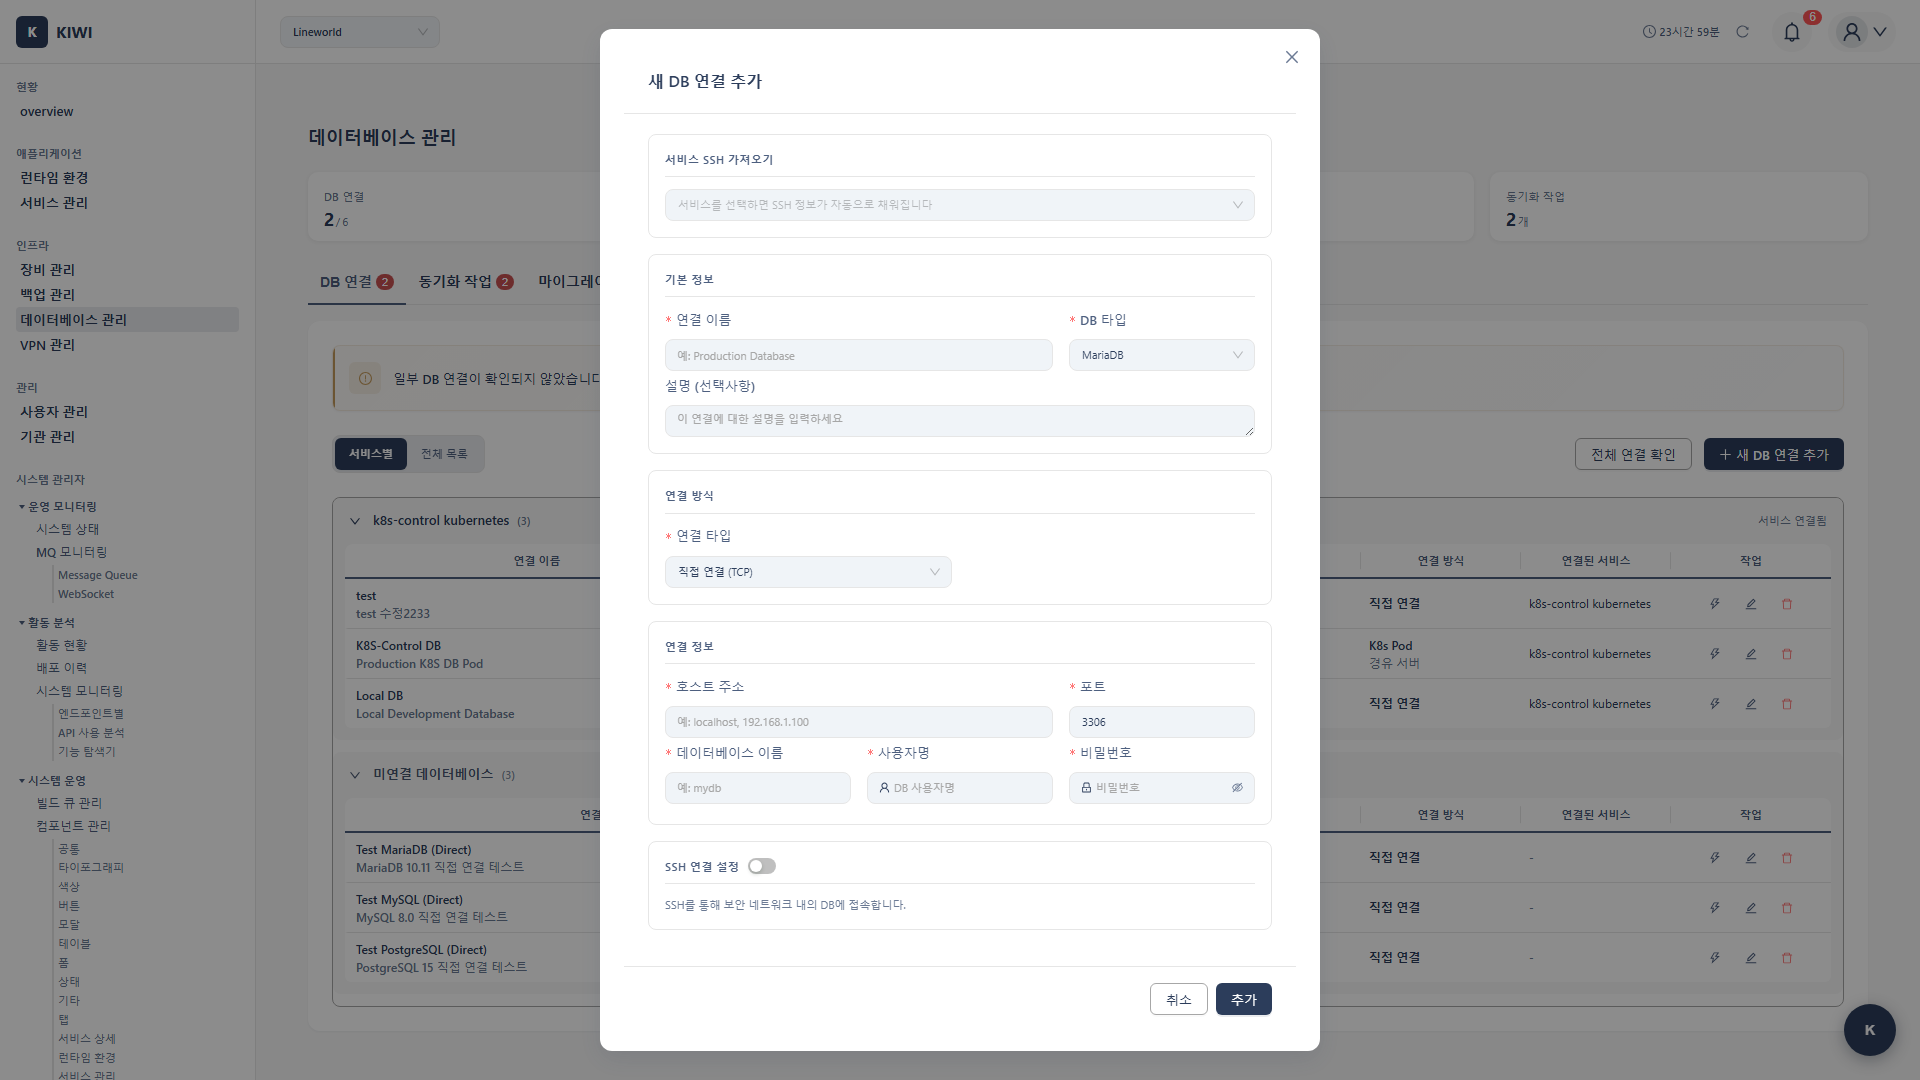
Step 1: Start Adding a Connection
- Navigate to the [Database Management] page
- Select the Connection Management tab
- Click the Add Connection button in the upper right corner.
Step 2: Enter Basic Information
- Connection Name (Required): An identifiable name. Example: "Prod-UserDB".
- DB Type (Required): Database type. Example: MySQL.
- Host (Required): Server IP or domain. Example: 192.168.1.100.
- Port (Required): DB port number. Example: 3306.
- Database (Required): DB name (schema). Example: kiwi_prod.
- Username (Required): DB account. Example: admin.
- Password (Required): DB password. Example: ********.
- MySQL / MariaDB: 3306
- PostgreSQL: 5432
- Oracle: 1521
If not using the default port, enter the actual port used by your DB server.
Step 3: Advanced Settings (Optional)
- Use SSL: Enable if encrypted connection is required.
- SSH Tunnel: Configure when accessing DB behind firewalls.
- Connection Timeout: Increase the value for slow network environments.
Step 4: Test Connection and Save
- Click the Test Connection button to verify connectivity.
- When "Connection successful" message appears, click Save
- Verify host, port, and account information are correct
- Check if the port is open in the DB server's firewall
- Verify the DB user has remote access permissions.
2. Configuring SSH Tunnel
Use SSH tunneling to access a DB behind a firewall.
When Do You Need SSH Tunnel?
- When the DB server is on an internal network and cannot be accessed directly.
- When security policy only allows access through a jump server (bastion host)
- When you need to securely access company DB from outside.
Configuration Steps:
-
Enable the Use SSH Tunnel checkbox in the add/edit connection screen
-
Enter SSH server information:
- SSH Host: Jump server IP. Example: 10.0.0.50.
- SSH Port: SSH port (default 22). Example: 22.
- SSH User: SSH account. Example: deploy.
- Authentication method: Choose between password or SSH key
- Password: Enter the SSH password
- SSH Key: Upload an SSH private key file (.pem, .key)
-
Enter the DB host address relative to the SSH server
- If DB is on the same machine as SSH server:
localhostor127.0.0.1 - If DB is on another server in the internal network: that server's internal IP
- If DB is on the same machine as SSH server:
-
Click Test Connection then Save
[KIWI] → [SSH Tunnel] → [Jump Server] → [DB Server]
           Encrypted connection
When using SSH tunnel, an encrypted channel is created from KIWI to the jump server, and the DB is accessed through that channel.
3. Creating a Sync Task
Set up a task to synchronize data between two databases.
Step 1: Add Task
- Select the Sync Tasks tab
- Click the Add Task button.
Step 2: Basic Configuration
- Task Name: A descriptive name (e.g., "Prod→Dev Sync")
- Source DB: Select the source connection to fetch data from
- Target DB: Select the destination connection to store data
Step 3: Select Sync Options
- Full Sync: Synchronizes all tables.
- Selective Sync: Synchronizes only selected tables.
- Conflict Resolution:
- Source-first - Overwrites with source data on conflict
- Target-first - Keeps target data on conflict
Step 4: Schedule Settings (Automatic Sync)
- Hourly: Example: Every 6 hours. Runs every 6 hours.
- Daily: Example: Daily at 03:00. Runs every day at 3 AM.
- cron expression: Example:
0 3 * * 1. Every Monday at 3 AM.
minute(0-59) hour(0-23) day(1-31) month(1-12) weekday(0-6, 0=Sunday)
Common Examples:
0 3 * * *- Every day at 3 AM0 */6 * * *- Every 6 hours.0 0 * * 0- Every Sunday at midnight
Step 5: Save Review your settings and click the Save button.
4. Running a Sync Task Immediately
Execute a configured sync task right away.
- Find the task you want to run in the Sync Tasks tab
- Click the Run button for that task
- Click Confirm in the confirmation popup
- Monitor progress through the progress bar
- After completion, check results in the Sync History tab
- Data in the target DB will be modified.
- Large tables may take a long time to sync
- Run production DB sync during periods of minimal service impact (early morning)
5. Running Migration
Migrate your database to a new environment.
Step 1: Start Migration
- Select the Migration tab
- Click the New Migration button.
Step 2: Source/Target Configuration
- Source DB: Select the source database to migrate from
- Target DB: Select the target database in the new environment.
Step 3: Select Migration Options
- Schema Only: Migrate only table structure without data. Use for initial new environment setup.
- Include Data: Migrate both structure and data. Use for full environment replication.
- Backup Before Proceed: Automatically backup target DB before migration. Recommended as it enables rollback if issues occur.
Step 4: Validate and Execute
- Click Validate Schema to check compatibility beforehand
- If no issues, click Start Migration
- Monitor progress in real-time
- Large DB migration may take significant time
- Run production DB migration during maintenance windows to minimize service impact
- Always enable the Backup Before Proceed option.
6. Creating DB Backup
Backup your database for safekeeping.
Manual Backup:
- Select the Backup Management tab
- Click the Create Backup button.
- Select the target DB connection.
- Configure backup options:
- Backup Name: Easily identifiable name (e.g., "ProdDB-2024-03-15")
- Include Items: All or specific tables.
- Click Start Backup
Scheduled Backup Setup:
- Click the Schedule Settings button in the Backup Management tab
- Select the target DB
- Configure schedule:
- Daily: Run at specified time every day (e.g., 03:00)
- Weekly: Run on specific days (e.g., Sunday 02:00)
- Monthly: Run on specific dates (e.g., 1st at 01:00)
- Configure retention policy:
- Retention Period: Auto-delete after e.g., 30 days.
- Retention Count: Keep only e.g., last 10 backups.
- Click Save
7. Restoring DB
Restore data from backup.
- Select the Backup Management tab
- Find the backup to restore in the backup list
- Click the Restore button for that backup
- Select the target DB (can be different from original)
- Configure restore options:
- Existing Data Handling: Delete and restore / Merge
- Click Start Restore
Restore operations modify existing data in the target DB. Always backup the current state before restoring in production environments!
Execution History Status
Check the progress status of all operations including sync, migration, and backup/restore in the Execution History tab.
- completed: Operation finished successfully.
- running: Operation currently in progress.
- failed: Error occurred during operation (check details)
- pending: Waiting to run according to schedule.
- Click on the failed operation in Execution History
- Review the detailed error message
- Common causes and solutions:
- Connection failure: Check network status or firewall settings.
- Permission error: Verify DB user has required permissions.
- Schema mismatch: Source and target table structures differ. Run migration validation first
- Insufficient space: Check disk space on target server.
Glossary
Simple explanations for terms you may encounter for the first time.
- Schema: The logical structure of a database (tables, relationships, etc.). In MySQL, it's synonymous with database.
- SSL/TLS: Security protocols that encrypt network communication. Same as what's used in HTTPS.
- SSH Tunneling: A technique for securely forwarding other service traffic through an SSH connection.
- cron expression: Standard syntax for specifying scheduled task timing in Unix-like operating systems.
- Dump: Exporting database structure and data to an SQL file.
- Jump Server: A relay server for accessing internal networks from outside (bastion host).
Best Practices
Recommendations for safe and efficient database management.
- Use SSL connections: Essential especially for external network communication.
- Use dedicated accounts: Create sync-specific DB accounts with minimal permissions.
- Password management: All DB passwords are stored encrypted.
- Sync timing: Synchronize production DBs during periods of low service impact (early morning)
- Connection testing: Always run connection tests before important operations.
- History monitoring: Regularly check sync history for failures.
- Backup before restore: Always backup current state before restoring.